This blog post is a summary of a workshop I ran at Mathsconf16 and 17. The session was called “The Pareto Principle of Lesson Planning” and the rationale was to explore how the Pareto Principle explains that the general relationship between inputs and outputs is not balanced. It can be the case that a small number of inputs can lead to increased outputs I explore this in more detail and use the context of teaching perimeter.
What is the 20% of the input that contributes to 80% of the result?
The 20% input is referred to as Atomising. This is the process where you break down a topic into its sub-tasks. This is a term coined by Bruno Reddy.
The 80% result this achieves is that it allows pupils to develop flexible knowledge of the concept.
Atomising avoids two common pitfalls. Firstly, it avoids re-teaching. I’ve certainly been in a position where I have taught a unit of work and then realised certain sub-tasks that I could have taught which would have helped my pupils develop a better understanding of the concept. Secondly, you avoid missing out sub-tasks to teach. When you breakdown a topic into its sub-task you avoid missing out certain aspects of a topic which really need to be taught explicitly. Due to the so-called ‘curse of knowledge’, teachers often forget that there are certain decisions and procedural knowledge that we have but which we forget to teach to the kids. Either it is so obvious that we think the kids already know it or, more commonly, we don’t realise which areas of the topic we are teaching pose difficulties for the kids. It could be that the difficulty is caused by a weakness the pupil may have in a different area of maths. For example, if a child is finding the missing side length of a shape, and the perimeter is a whole number, and the sides add up to a decimal, then the area of difficulty may be that a pupil doesn’t know (or remember) how to subtract a decimal from a whole number.
Here are the 12 sub-tasks that I used to break down the topic of perimeter. I chose perimeter deliberately because I think it is a perfect example of a topic which is perceived to be very easy for pupils to learn. However, there are certain aspects of perimeter that I will identify which I don’t think are explicitly taught. I think this because I have seen this to be the case when looking through several secondary maths textbooks.
Atomising
Perimeter:
1) Perimeter of Irregular shapes
2) Perimeter of rectangles
3) Perimeter of parallelograms
4) Perimeter of regular polygons
5) Manipulating the perimeter of regular polygons
6) Manipulating the perimeter of a rectangle – one side length given
- Given the perimeter, what is the perpendicular length
- Writing the possible side lengths of a rectangle given the perimeter
7) Manipulating the perimeter of an Isosceles triangle and an Isosceles trapezium
- Given the perimeter, what is the size of each equal side length
8) Perimeter of a compound shape
- What is a compound shape?
- Perimeter of a L-shape compound shape (irregular hexagon)
- Perimeter of non-L-shape compound shape
9) Manipulating the perimeter of a Compound shape
- Finding one missing length of a compound shape – not using the perimeter
- Finding one missing length of a compound shape – using the perimeter
- Finding two missing lengths (not connected) of a compound shape – using perimeter
- Finding two missing length (connected) of a compound shape – using perimeter
10) Perimeter of Compound shape – combining polygons
- Combining regular polygons to form a compound shape – using the perimeter of the original polygons
- Combining irregular polygons to form a compound shape – using the perimeter of original polygons
11) Perimeter: Increased, decreased or stayed the same
12) Drawing shapes on a square grid
The thinking time that went into breaking down the topic of perimeter took me 10 minutes. I think if I hadn’t gone through this process then I would have certainly missed many sub-tasks. In addition, it would have resulted in me having to do a lot of re-teaching.
Please note that some images aren’t drawn to scale, unless stated.
Example Sets for Each Sub-Task
1) Perimeter of Irregular shapes
I started to teach perimeter using explicit examples where pupils had to deliberately add all the lengths. They had questions where the side lengths were labelled using integers, decimals (same number as well different number of decimal places), multiples of 10, etc.

2) Perimeter of rectangles
I started teaching this with all side lengths labelled, then only three sides labelled, then only one pair of perpendicular lengths labelled. Then I included questions where pupils had to deliberately compare the perimeter of two shapes. The questions were designed so it wasn’t visually obvious which shape had the larger perimeter. Here is an example:
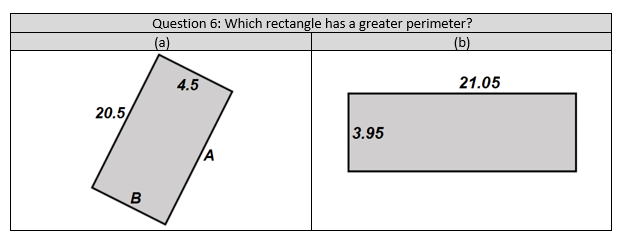
An example like the one above forces pupils to add the values because, even though the longest length has increased in size, the smaller length has decreased in size. This question is also designed so the shapes have the same perimeter.
3) Perimeter of Parallelograms
This sequence was very similar to the sequence for finding the perimeter of a rectangle:
- All side lengths labelled
- Three side lengths labelled
- One long and short length pair labelled, etc
4) Perimeter of Regular polygons
Here pupils are being taught to calculate the perimeter of a regular polygon using multiplication. They are taught that if you multiply one side length by the number of sides then you can calculate the perimeter.
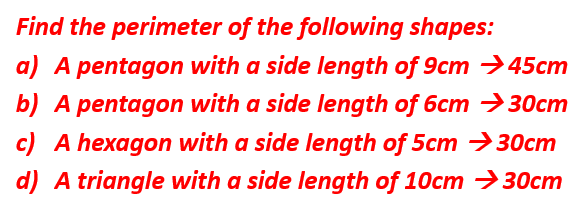
The sequence of questions shown above demonstrates that we can get the same perimeter despite the polygon changing and its side length changing. I have also deliberately designed the questions to communicate this flexible understanding of perimeter. From the first question to the second, the side length changed. When you move to the third question then the shape and side length change, but the answer doesn’t change. For the fourth question, the side length and shape have changed but the answer doesn’t change.
5) Manipulating the perimeter of a regular polygon
Here pupils are given the perimeter of a regular polygon, and they know the number of sides each regular polygon has, so they need to find the side length of that regular polygon.
Here is an example set of questions:

Here the perimeter of the shape has stayed the same, but the shape has changed. Here pupils can see that when the number of sides increases, then the side length decreases, given that the perimeter hasn’t changed. They can also see examples where the side length can be a fraction.
I haven’t asked pupils to convert the improper fraction into a mixed number because a mixed number communicates size in a way that an improper fraction doesn’t. A mixed number would communicate more to a pupil about the side length of a square in relation to the side length of the pentagon in the previous question. However, the focus is not in understanding the magnitude of the square and heptagon. The focus here is to get pupils to state the perimeter of a regular shape given the perimeter of that shape. Pupils are practising the procedure of dividing the perimeter by the number of sides of the regular polygon, to find the side length.
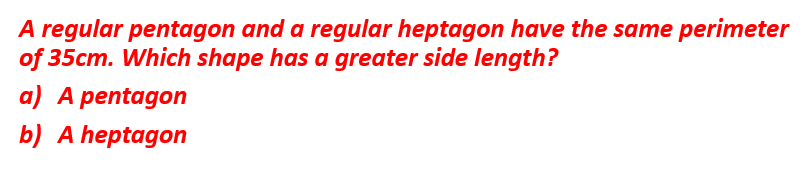
Pupils are then asked questions where they are given the perimeter and they must state which regular shape would have the greatest side length. This helps pupils to see that a regular polygon with more sides will have a smaller side length compared to a regular polygon with fewer side lengths, given they have the same perimeter.
For example:
And here is an example where they aren’t given the perimeter at all:

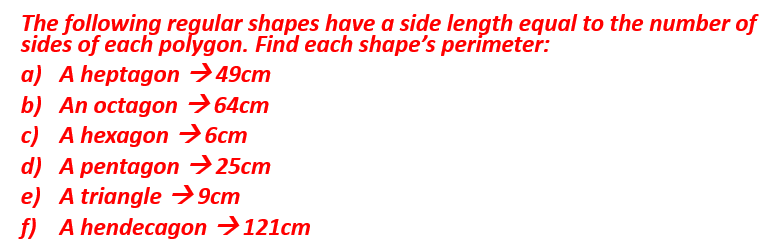
Within this aspect of perimeter, I also created questions where pupils had to find the perimeter of a regular shape knowing that the value of the side length is equal to the number of sides that polygon has. Here pupils are using their square number knowledge to find the perimeter of a regular polygon.
6) Manipulating the perimeter of a rectangle – one side length given
Here pupils are given one side length of a rectangle and the perimeter of that rectangle. They now need to find the other perpendicular side length. Here they are practising the procedures of:
1) Double the side length given
2) Subtract from the perimeter
3) Divide that by two to find one of the missing side lengths
Here are some examples:
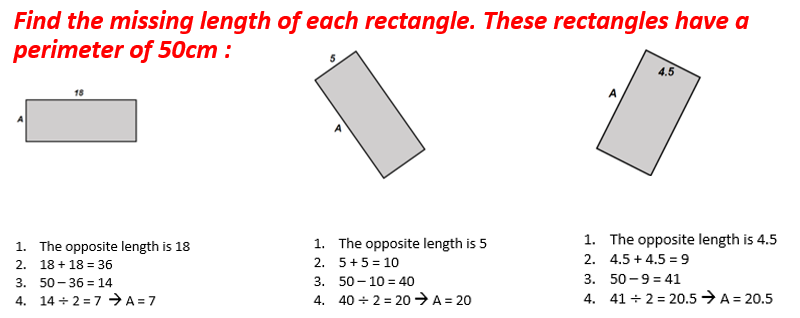
I deliberately put in an example where pupils were doubling an even number for the first example and an odd number for the second example. I deliberately gave pupils the longest length in the first example and the short length in the second example. This is because I want them to see that I have changed the side length but the procedure to find the other length hasn’t changed.
The third example uses a decimal because, when you double it, you get an odd number. When you subtract from the perimeter, you get an odd number, so when you halve the odd number you then get a decimal. I made the question arithmetically more difficult because I knew that in the first two examples the answer would be an even number which is divisible by two. I wanted to make a question where pupils could see that you can get a rectangle with a side length which is a decimal, and not a whole number.
I then moved on to asking pupils to state the different possible rectangles they could make for a specific perimeter. There are many possibilities. I restricted the possibilities by putting in a few conditions. Here is an example:
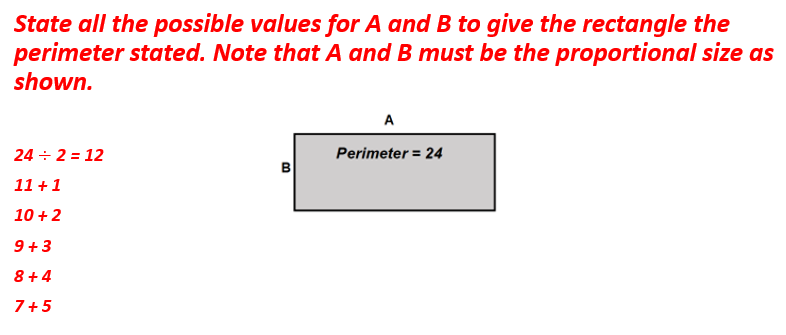
Here pupils can only give these answers, because the first value is A, and it must be larger than B’s value. In addition to this, I designed the question so pupils had to stop at 7 + 5 to avoid writing 6 + 6 because then the value of A and B would be the same. This is not what the question is asking.
7) Manipulating the perimeter of an Isosceles triangle and an Isosceles trapezium
Here pupils will practise finding the missing side length of an Isosceles triangle where they are practising the procedure:
1) Perimeter – base length
2) Divide by 2 to find the value of each equal side length
The images aren’t drawn to scale. Here are some examples:
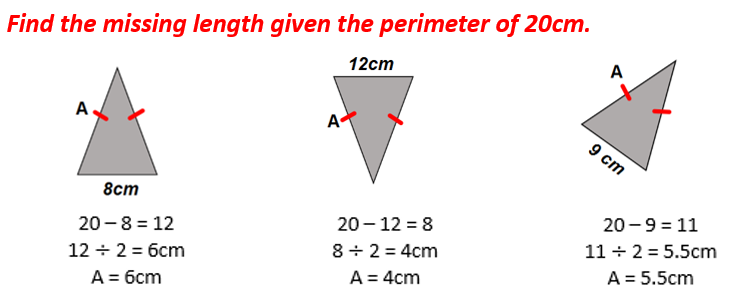
Here I deliberately used 8 and 12 in the first two examples to get kids to actively use the procedure to avoid being in autopilot mode. The numbers are similar for this reason. Pupils can then see that as the base length increases between the first and second question, the side length becomes smaller. In the final example I use an odd number for the base number, to deliberately get each equal side length to be a decimal.
Pupils then apply a similar procedure to find the missing side lengths of an isosceles trapezium, but there is an additional step:
1) Add the known side lengths
2) Perimeter – total of side lengths
3) Divide by 2 to find the value of each equal side length.
The images aren’t drawn to scale. Here are some examples:
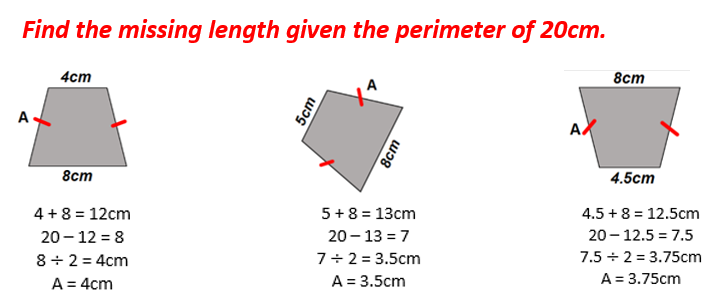
Pupils here also see that, when the top parallel length increases from the first example to the second example, each equal side length decreases. Similarly, from the second to the third example, when one of the parallel lengths go from 5cm to 4.5cm, each equal side length increases.
8) Perimeter of a compound shape
Pupils will learn what a compound shape is. They will then find the perimeter of a compound shape. I will use the L-shape compound shape because pupils will eventually learn that if you add the longest horizontal length and the longest vertical length, then double it, you will also find the perimeter of the shape.
Pupils will see questions where they are working with integers, decimals, both etc.
The images aren’t drawn to scale. Here are some examples:
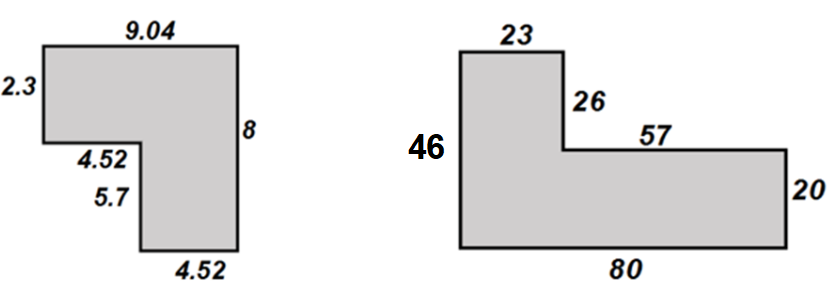
They will then learn to find the perimeter of different types of compound shape. The images aren’t drawn to scale. Here are some examples:
9) Manipulating the perimeter of a compound shape
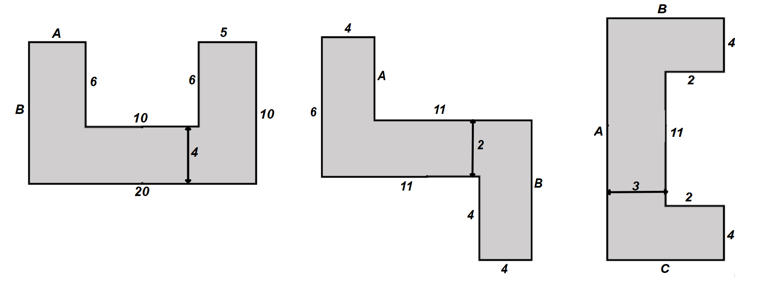
Here pupils will first be asked to find the missing length. They won’t be using the perimeter at all. This is because I want pupils to understand which lengths are related to each other, and which aren’t. In the second image, the vertical lengths are related because the longest length subtract the shorter length will find the value of A. These lengths are connected to each other.
Similarly, in the second image, the horizontal lengths are related because the two shorter horizontal lengths sum to give the size of the longest horizontal length. These lengths are related.
So, pupils will first practise finding the missing lengths without using the perimeter at all.
They will then be asked to find the perimeter of the shape once they have found the missing values for A and B.
The images aren’t drawn to scale. Here are some examples:
Here is another example which is rotated to get pupils to still identify the connected side lengths:
And another, finding a missing length for different compound shapes:
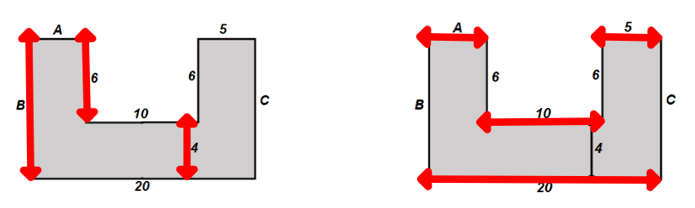
I then increase the difficulty in finding the missing length of a coumpound shape. Here we can’t find the missing lengths unless we have the perimeter. This is because the third image has two conneted vertical lengths which are missing.
The images aren’t drawn to scale. Here are some examples:

If the perimeter of the compound shape is 36cm, now I can find both missing lengths.
The images aren’t drawn to scale. Here are some examples:
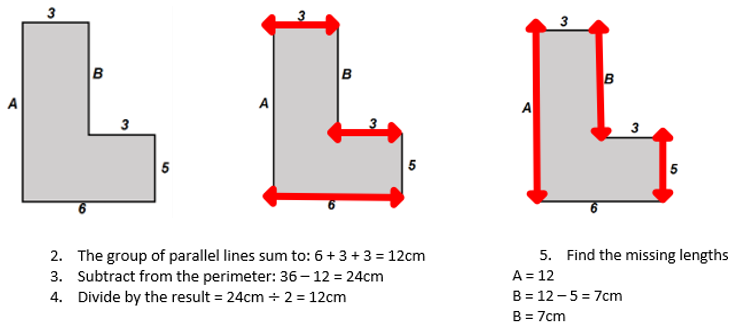
Questions like these allow pupils to understand the following:
1) If two connected lengths are missing, then I can only find these lengths if I have the perimeter
2) Given the perimeter, I must follow this procedure.
I like these questions a lot because I have made the concept more difficult by not combining other perimeter with other concepts, or by making the numbers more difficult. I have taken the concept of perimeter with compound shapes and changed the amount of information given. The difficulty is within the concept.
10) Perimeter of Compound shape – combining polygons
- Combining regular polygons to form a compound shape – using the perimeter of the original polygons
Here pupils are learning to combine different shapes to form a compound shape. Here they see a compound shape being formed and trying to understand what lengths are required and which aren’t required. The images aren’t drawn to scale. Here are some examples:

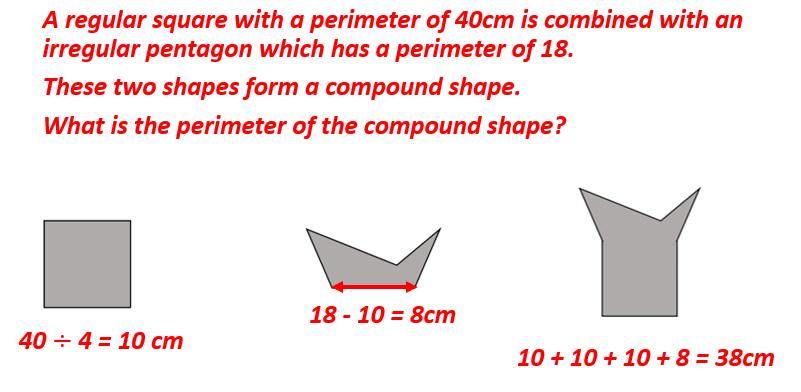
- Combining irregular polygons to form a compound shape – using the perimeter of original polygons
Here we have moved from combining regular shapes to irregular shapes. I must structure the question in a way that one length of the first shape is equal to one length of the second shape. This gets pupil again recognising which side lengths of the two original shapes are required, and which aren’t, to find the perimeter of the new compound shape. The images aren’t drawn to scale. Here are some examples:
11) Perimeter: Increased, decreased or stayed the same
Pupils are moving onto identifying that the perimeter is something that can change by increasing, decreasing or changing shape, but the perimeter can remain the same.
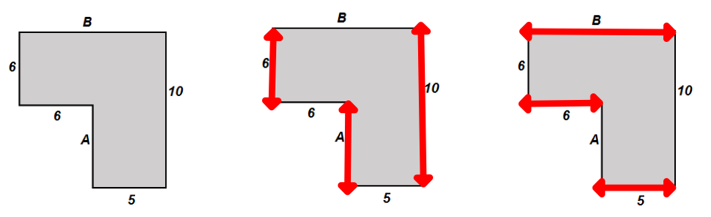
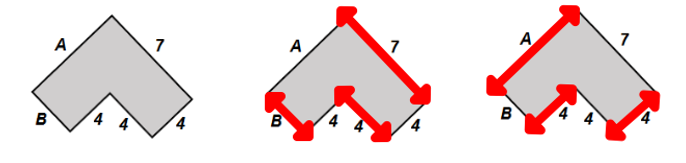
Here they aren’t being asked to find the perimeter of a shape, but instead they are to say whether the shape has a perimeter which is greater than, smaller than, or equal to the perimeter of the original image. The images aren’t drawn to scale. Here are some examples:
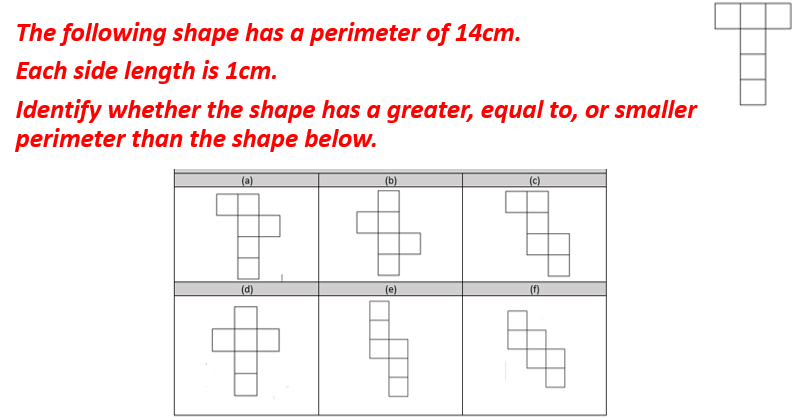
This also allows pupils to see that we can change the image and that the perimeter can change, but it also may not change.
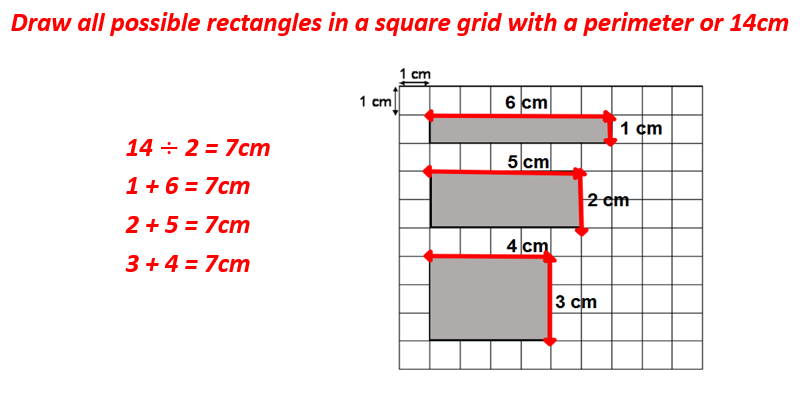
12) Drawing shapes on a square grid
Pupils are now at a point where they are taking their knowledge of drawing rectangles with a specific perimeter which has been taught in this sequence, but now drawing it on a square grid.
The images aren’t drawn to scale. Here are some examples:
Pupils are then equipped to match a specific perimeter to a specific image. They are applying what they have learnt rather than answering direct questions.

Leave a Reply
You must be logged in to post a comment.