Conception of the good

Insights into our current education system

Dixons Manningham with Direct Instruction in action!

Despite being a secondary teacher, I’m inspired to move into primary. The scope for determining a child’s academic trajectory from their primary education is huge. Beyond my imagination. And the more I learn about primary education, focusing on primary mathematics the more inspired I am to visit Primary schools.

I had the pleasure of meeting Terri Leighton, Principal of Dixons Manningham, whilst attending the National Institute for Direct Instruction conference. We both attended the Administration (Principal) Institute to learn about the most ideal conditions for a primary school running Direct Instruction (DI) Programmes. The Institute covered everything from the DI programmes to run from Reception to Year 6, scheduling, teacher recruitment, coaching and data collection. It was the best CPD I’ve ever had, and I regularly refer to my notes from the conference.

I arranged a visit to Dixon’s Manningham in Bradford which was kindly arranged by Abigail Burrows (Class Teacher). It was eye-opening and debunked some of the false narratives I’ve heard about primary education. My two takeaways were (a) consistency in routines and (b) Modelled Direct Instruction

Before I begin, I saw very happy, enthusiastic and successful children. I saw committed and happy teachers who knew they were making a difference. For that reason alone, I’d recommend visiting. I also loved seeing Family lunch in a primary context.

Consistency in Routines

In the space of a day, I visited every single classroom and watched a lesson from every year group. The consistency of routines was evident across the school from Early Years to Year 6. I saw consistency in teacher language for a specific desired pupil change in behaviour to prepare for the next teaching activity. And this was the case across each room I went to observe. For example,

Teacher: 3-2-1-Eyes on me

Pupils: 3-2-1-Eyes on you (all in sync)

The teacher would change their posture to model to children that they need to empty their hands, cross their arms, turn their bodies to face the teacher, and sit tall in their chairs. I saw the use of timers for ‘Watch the clock’, ‘Cold Call’ to see pupils all engaged and actively listening. I saw the use of ‘No Opt Out’ to ensure that a pupil who couldn’t participate had an opportunity to later.

Routines were embedded in ways which were noticeable and unspoken. This shows that the teachers hold pupils to account to follow through with the routines because pupils knew what to do. For a school to achieve this, school leaders and teachers sweat the small stuff. I’ve seen it executed well during my time at Michaela Community School and Great Yarmouth Charter Academy. Here are some examples of the routines I saw at the school:

  1. Pupils had their equipment positioned the same way in each classroom.
  2. Pupils knew how to begin the Do Now with minimal teacher instruction. This ensured a purposeful start to the lesson.
  3. Pupils walked around the school in a single file. I saw teachers in Early Years and Year 1 stating the expectations for lining up, entering the classroom and exiting. Hands by your side, eyes facing forward and tracking me.
  4. Pupils had a school planner where they diarised their assigned homework, reading records etc.

When I asked Terri about the systems behind the consistency in routines, she explained it’s twofold:

  1. Weekly coaching meetings between colleagues
  2. Planned Coaching strand

The planned coaching strand was insightful. It gave structure and guidance to the coaching sessions. The school identified the 6 non-negotiable TLAC (Teach Like a Champion) techniques that provide a purposeful, pacey and positive teaching environment. Each coach works with their assigned teachers to rehearse and implement a new TLAC technique. The strand allows flexibility to focus and master implementing one TLAC technique or move on to mastering more. See the image below.

Modelled Direct Instruction

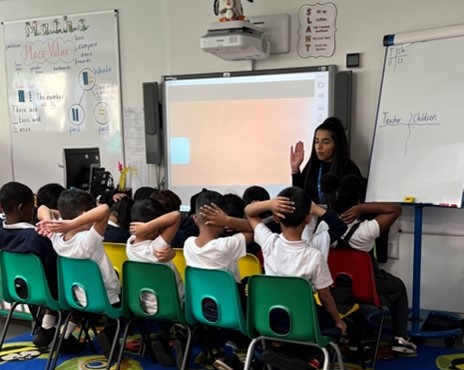
I visited Dixons Manningham to watch DI programmes implemented in a primary setting. I saw a range of different programmes but here were the main takeaways:

  1. The classroom was set up, so pupils were visible to the teacher, and the teacher was visible to the pupils.
  2. Pupils had the relevant textbook/worksheet during instruction, and all had their index fingers at the correct part and followed the teacher’s instructions
  3. Pupils were moving through the content at pace
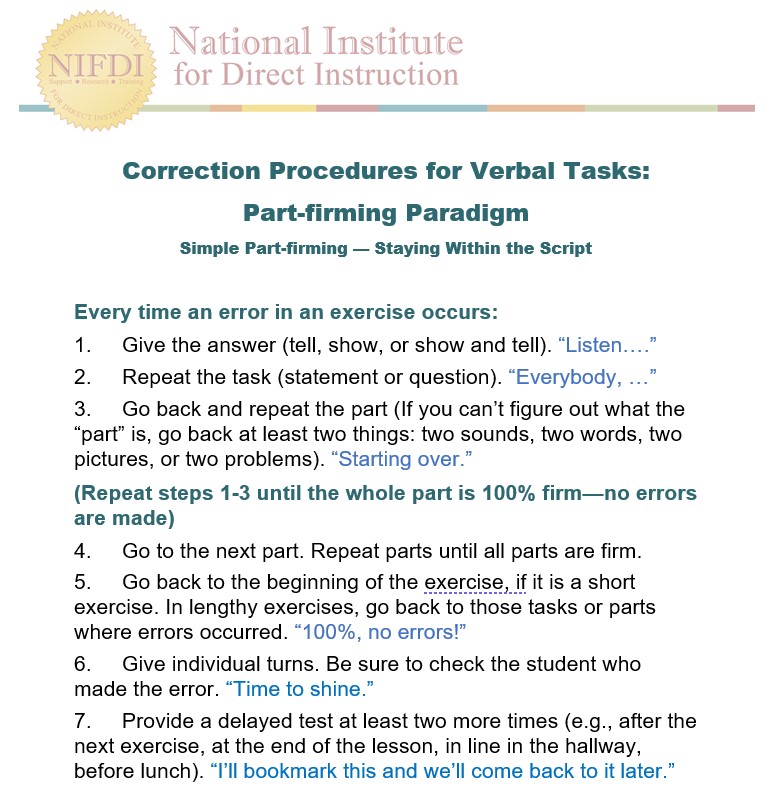
  4. When pupils made a mistake, the teacher took them through the seven steps of error correction. See image. This meant that when a child made a mistake it was corrected before moving on. This is a key element in DI teaching.
  5. Pupils were answering the teacher on signal and in sync

This is what I saw from the teachers:

  1. Teachers projected their voice to ensure that pupils responded with answers loudly and clearly
  2. Teachers signalled to pupils when they wanted pupils to respond e.g., by moving their hand
  3. The teachers were all enthusiastic and present. They had children gripped to every word.
  4. Teachers were scanning the room to ensure that pupils were tracking, listening and participating. Stopping in their tracks when a pupil began to fiddle or look out the window

It’s difficult to understand how DI Programmes are taught unless you’ve had pre-service training from NIFDI, taught a programme or watched DI lessons. Will potentially write a bit more on this soon.

I’m excited to watch Dixons Manningham’s journey. A statistic they shared with me: 71% of pupils in Year 3 are meeting age-related expectations. Expected to be higher for the next cohort of Year 3s. This is promising given that in 2019, 65% of pupils reached the expected standard in reading, writing and maths (combined).

Ernulf Academy: Are you the Heads of Maths we are looking for?

Appointing a committed, intelligent, and enthusiastic Head of Maths is my everyday focus. If you get the right person in the role, then the Principal and National Lead of Maths at a Trust are at ease. A lot of this seems like common sense but what gets forgotten is that it’s hard for any prospective candidate to know if your school is right for them. The fit has to go both ways.

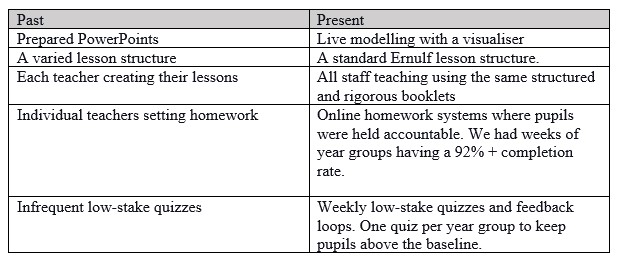
I’m incredibly passionate about one school, Ernulf Academy in St Neots, and we are searching for a Head of Maths.

At Astrea, my remit includes four schools in Cambridgeshire, each having its own set of distinctive priorities. I began my journey working with Ernulf Academy. A journey that was supposed to be three weeks in March 2021 became one where I’m an established member of the Department three days a week into this current academic year. This post is to give you an insight into the magical maths department at Ernulf Academy. A school that I would love to be a Head of Maths. A school where we want a phenomenal Head of Maths. Could that be you?

Ernulf Academy is full of potential. An exciting place to be with a visionary and open-minded Principal, driven SLT, welcoming staff and the loveliest children. But why is Ernulf Academy a unique place relative to the schools in the local area or your area?

Here are three of the many reasons.

Adopting a super team! 

A prospective Head of Maths would be working with a Maths team eager to learn, adapt their practice and are pumped to talk all things Maths. We have experienced members of staff as well as ECTs (Early Career Teachers) who all are enthusiastic about becoming the best teacher they can be. The dynamic is an open-minded, transparent, and candid one. We watch each other teach, and that’s a regular thing. ECTs observe established members of staff and equally the other way. We can learn from each other, and there isn’t a member of team who behaves with hubris.

The anecdotes to choose from are many, but I here are a few. One member of staff inquired if I’d be teaching any lessons for him so he could observe. I wasn’t, but I offered to teach his next lesson for him to watch. I emailed the Department, and three members also joined in observing. This was possible because of our systems. Next section.

One ECT has me observing in her room frequently – upon her request! There are times she asks me to jump in on delivering a few worked examples to watch. I love when she does this because she is honest about wanting support. Her teacher quality has catalysed this year as a result of our co-teaching.

In summary, the Department is keen to learn. They jump at any CPD opportunity within the school and outside of school hours. We have multiple teachers running the UK Maths Challenge Club and seeking to go on university trips with their classes.

Visionary and open-minded Principal

The changes that I’ve implemented in the school were only possible because the Principal trusted my choices, questioned and listened to me when there were doubts, and stood by the maths team and me all the way.

Raising standards did come with an initial backlash, but we persisted and supported each other. Working with Avin Bissoo, where he is open-minded, trusting, and a great communicator has heavily contributed to the sustained changes.

The number of suggestions accepted on the first hearing is equal to the questioned recommendations – requiring persuasion and compromise. Upon reflection, I wouldn’t want it any other way. He regularly refers to his school as our school with Trust members because we row together.

Our work-smart and systems-based Department

Last academic year, the Department went through a profound transition.

Before, the systems weren’t necessarily inadequate, but it created a great range in teacher quality delivery across the Department. The previous systems had inadvertent second-order consequences such as significant teacher workload, inefficient systems, and unnecessary bureaucracy.

We now work smart.

We are a cohesive team where each teacher, regardless of experience, can teach the subject to a high and consistent quality. We teach from the same booklets, rehearse how to teach procedures’ most effective teaching methods, and use mini whiteboards for AfL. 

We all use the school behaviour system.

We are a consistent team. The degrees in which teachers vary are right: their teacher personality in the room and the pace at which they proceed through the curriculum. The latter means that teachers with less knowledgeable pupils can spend more time ensuring pupils master taught concepts than their more knowledgeable pupils. The latter consolidate the basics before moving on. All pupils across the attainment spectrum learn all parts of the booklets – they vary in pace.

Summary

Ernulf Academy has come far, but we aren’t complacent. We know the road ahead of us and what our priorities are. We want to find a Head of Maths who wants to work with us, bring great ideas, and sustain the systems we have put in place. Systems that are shared with some of the top-performing Maths departments across the country.

However, the Head of Maths we are looking for needs to be a thinker, reader, work smart and be an excellent decision-maker. Somebody who learns from other successful schools and implements and sustains excellent practice. Somebody prioritises training the Department in teaching better through rehearsal, low-stake observation, co-teaching and frequent feedback.

Are you the Head of Maths we are describing?

If so, then come and visit. Our doors are open. Watch our maths teachers teach. Watch our pupils learn.

Here are the links to apply. Application Deadline 03/10/2021. Please do reach out to me via DM if you’d like to know more about the role, and the school.

  1. https://teaching-vacancies.service.gov.uk/jobs/head-of-maths-ernulf-academy
  2. https://ce0218li.webitrent.com/ce0218li_webrecruitment/wrd/run/ETREC107GF.open?VACANCY_ID=4442326nG1&WVID=9718725LZY&LANG=USA

Avonbourne Academy Visit

On the 13th-14th October, I attended the Direct Instruction Corrective Mathematics at Avonbourne Academy in Bournemouth. Kevin Surrey and Suzy Cudapas delivered the training, it was brilliant, and I have much to share about it soon. Firstly, I wanted to share a few thoughts from Visiting Avonbourne Academy.

At break time, teachers attending the training were invited out to watch lineup. Lineup is when teachers ask pupils to stand in a straight line in silence with their peers for their next lesson together. Its purpose is for pupils to quickly transition from the playground, through the school and to their classroom. Lineup takes place in the morning, during break time, lunchtime and at the end of the school day. What I saw was a quick 6-minute turnaround from pupils speaking to their peers in the playground to an empty area with pupils already in the school building.

Many great schools do the same lineup, such as Michaela Community School, The Totteridge Academy, Great Yarmouth Charter Academy (GYCA), and many more. I have also been on many school visits where I’ve seen line up but not as effectively or purposely as I saw at Avonbourne Academy. What is an effective and purposeful lineup?

Firstly, teachers who have a lesson the following period should escort pupils to their classroom. I saw this to be the case at Avonbourne. The Assistant Principal (AP) stood up on the podium, silence fell amongst pupils, and they automatically formed a straight line with their classroom teacher walking up and down. The AP said, “Everyone’s eyes tracking me”, which means watching the speaker with your eyes. Many schools teach the term ‘SLANT’, which is explained below, and T in SLANT is usually taught to pupils explicitly to ensure they face the speaker. Result: Pupils were facing forward in a straight line and listening to the AP.

There are different variations of SLANT, here are two:

Sit Up

Listen

Ask & answer the questions

Nod your head

Track the Speaker

Sit up straight with arms folded

Listen

Ask and answer questions

Never interrupt

Track the speaker

Secondly, I noticed that lineup was purposeful because pupils had an equipment check. It took 1 minute. How? Pupils had a clear pencil case which meant that teachers could check pupils were equipment ready quickly. At Avonbourne’s lineup, teachers walked up and down the line checking pupils’ equipment. At Michaela, we would take lineup as an opportunity to chant poetry or rolling numbers (Times Table Rockstar chants).

Once pupils were ready and the equipment check was complete, the classroom teacher said, “Turn and face, please. Pace and purpose. Follow me!” Every teacher said the same thing, which showed consistency in teacher language across the school, which meant that pupils behaved consistently with all their teachers.

One classroom teacher noticed that whilst they were walking towards the school building, a couple of her pupils started speaking. She stopped the line and addressed the pupils saying, “We will do it again.” They went back into a straight line in the playground and walked into the school in silence.

The teacher demonstrated a Teach Like A Champion strategy called ‘Do it again’, which requires students to immediately repeat a task that was not completed to the teacher’s standards. The strategy is used when students cannot complete a task their teacher has already explained how to accomplish.

At the end of lineup, there was a mixed reception from the visitors. The majority, including myself, were pleased and impressed to see the calmness and purposefulness of lineup. Some commented that they felt it was too ‘regimented’. I guess it is regimented, but alternatively, it means that pupils can go into their classroom peacefully, equipment ready, and their behaviour is reset to be engaged to learn after a period of play.

Thirdly, the lineup I saw was a consistent routine that the school had for two years. Pupils know what to do, so do teachers, and when standards slip, teachers ask pupils to try to line up again to the standards set.

Pt 4 Reattempting Circle Theorems

This blog post is the fourth of a series ‘Reattempting Circle Theorems’. We have looked at the following circle theorems and a non-circle theorem:

Circle Theorem #1: A right angle triangle in a semi-circle

Show that: Two radii and a chord form an Isosceles Triangle

Circle Theorem #3: A cyclic quadrilateral’s opposite angles add to 180 degrees

We will now look at the next circle theorem:

Circle Theorem #4: Angles at the circumference in the same segment are equal

The booklet attached below follows the same structure:

  1. Starting with the circle and outlining its features to deduce the circle theorem
  2. Start with examples to find the missing angle(s) of
    1. the circle theorem in isolation
    2. interleaved basic angle facts
    3. interleaved previously taught circle theorems
  3. Algebraic section (In this case, I haven’t attached it because I would do it differently now)

Can you imagine your weakest children being able to find all the missing angles?

Introducing the Circle Theorem: Angles in the same segment are equal

Here is a circle:

Mark the first point on the circumference:

Mark a second point on the circumference:

Mark a third point on the circumference:

Draw a chord from the first point to the third point:

Draw a chord from the second point to the third point, and this forms the first angle:

We can draw a chord between the first and second point, so we form two different segments. The angle is in the bigger segment. We can call this the major segment.

Draw a fourth point in the same segment, and draw a chord from the first point to the fourth point:

Draw a chord between the second and fourth point on the circumference, and this forms the second angle in the same segment:

We can see that the angles are equal. We can see that using the first and second point on the circumference we have created two equal angles in the same segment.

Mark a fifth point on the circumference and draw a chord between the first and fifth point:

Draw a chord between the fifth and second point, to form an angle at the circumference in the same segment:

We can see that three equal angles made by the first and second point are in the same segment.

What if we mark a sixth point on the circumference that is the other segment?

And we draw a chord between the second and sixth point to form an angle in the other segment:

We can see that the angle in the other segment is not the same size even though it is made by the first and second point on the circumference. It is not the same size because the angle is not in the same segment.

Pedagogical Quandary

As a side note, I’ve come to realise that there are a few different ways that teachers describe what’s happening here.

The first, which I was using, was to explain that any angles in the same segment, subtended by the same arc, are equal.

The second, is that any angles in the same segment, subtended by the same chord, are equal.

So, which is correct; which should we use?

Well, a chord necessarily forms an arc… and each unique chord forms a unique corresponding arc… so, if we know the chord, we know the arc, and if we know the arc, we know the chord.  In other words, its redundant to use both, and we can choose either and be completely correct in what we’re saying.

For me, I used to use the language of ‘arc,’ but have chosen to now switch to the talking about the angles as subtended by the chord instead, since it’s the chord that splits the circle into different segments, not the arc.

You can’t avoid drawing in a chord at some point, to create the two segments, so discussing the arc as well, right up front, is probably just adding more unnecessary, extraneous cognitive load.

Even for me as a teacher, I was struggling to understand the point about the angles being in the same segment, since I wasn’t drawing in any chords… I felt like I was just saying the words, just getting kids to parrot back ‘angles in the same segment are equal,’ when even I couldn’t see where the segment was!  I’m questioning the value using this whole ‘arc’ language now. This is something I saw yesterday at Mathsconf which confirmed that I felt needed addressing.

Find the missing angle using the Circle Theorem

At this point, I would state the steps to find the missing angle before looking at a few examples. Pupils can follow the steps if they lose track during the example explanation.

Here are the steps:

  • Circle known angle
  • Highlight the two lengths that form that angle
  • Circle the two points at the end of each length of that circled angle
  • Draw a dashed chord between the two points to show the segment that the angle is made
  • Highlight the pair of lengths that form another angle in the same segment
  • The angles at the circumference made in the same segment are equal

Here are the pupil-attempt (We do) examples to find a missing angle or angles. The variation between the examples isn’t evident here. I try to change one change at a time between the ‘I do’, and the ‘We do’ example. I’ll explain the thinking behind choosing each example:

  1. State that angle ‘a’ is 60 degrees because the angles at the circumference are equal in the same segment.

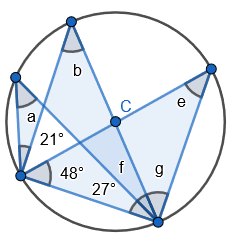
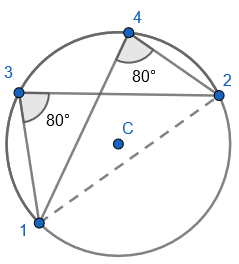
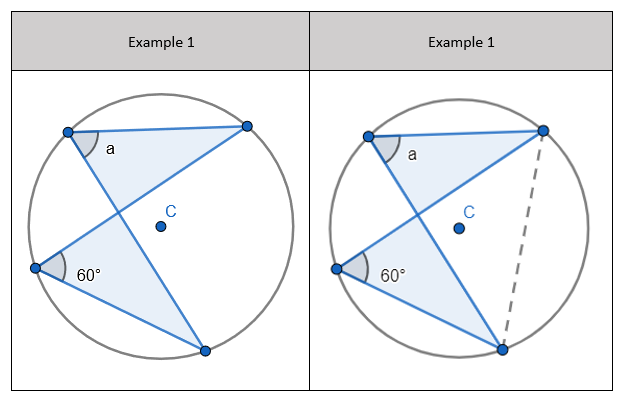
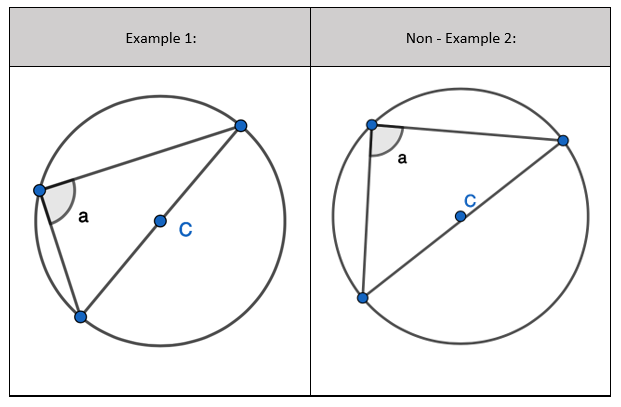
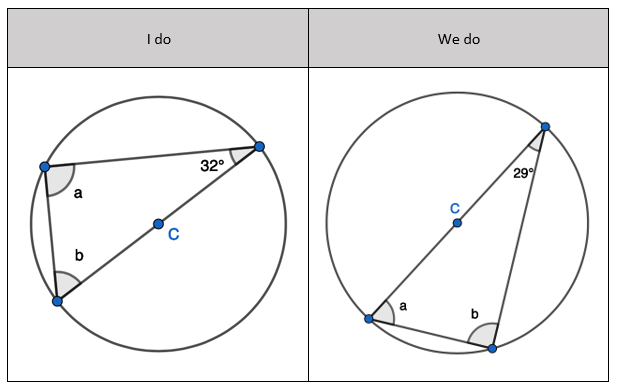
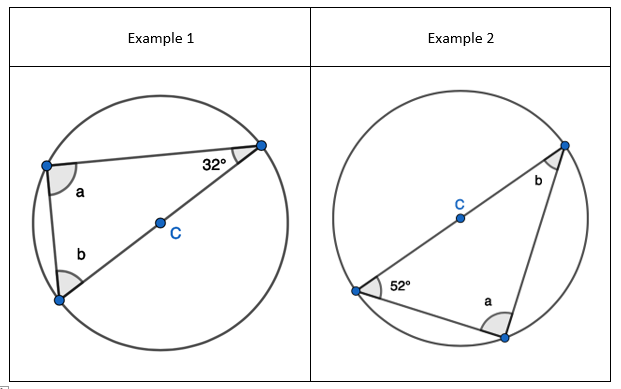
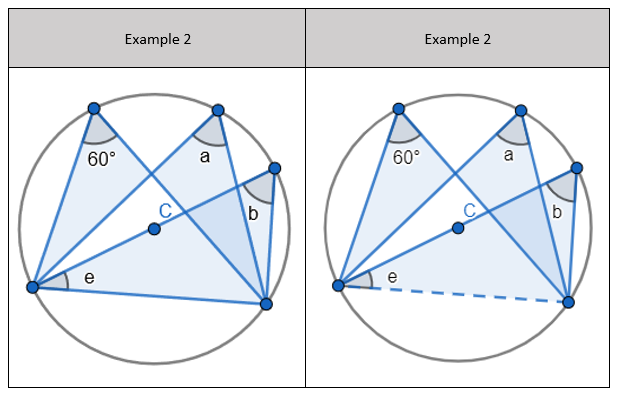
2. State that angle ‘a’ and ‘b” is 60 degrees because the angles at the circumference are equal in the same segment. Here we are showing that more than two angles are equal in size at the circumference from being in the same segment. I have interleaved the first circle theorem – an angle in a semi-circle is 90 degrees. If we total ‘b’ and 90 degrees to then subtract from 180 degrees then we can find ‘e’.

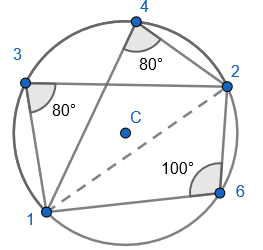
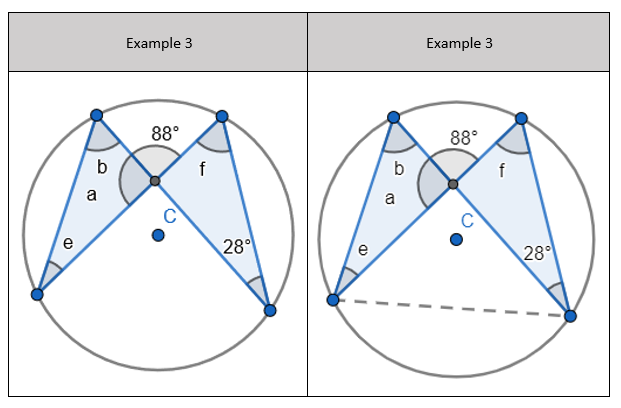
3. State that angle ‘e’ is 28 degrees because the angles at the circumference in the same segment are equal. Find ‘a’ using the basic angle fact that angles on a straight-line sum to 180 degrees. Find ‘b’ using the basic angle fact that angles in a triangle sum to 180 degrees. State that ‘f’ is the same angle size as ‘b’ because of the circle theorem we have just learnt.

4. This is the same problem type as the third example but now I’ve added a chord to form a triangle with angle ‘f’, ‘h’ and ’48 degrees’. We can find ‘f’ to be 88 degrees because it is vertically opposite to it. We can find ‘h’ using the basic angle fact that angles in a triangle sum to 180 degrees.

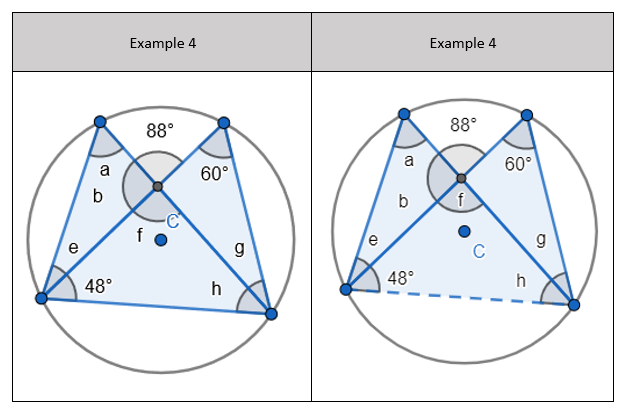
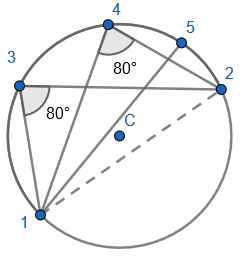
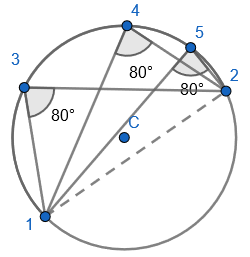
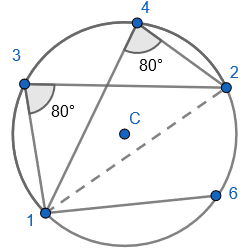
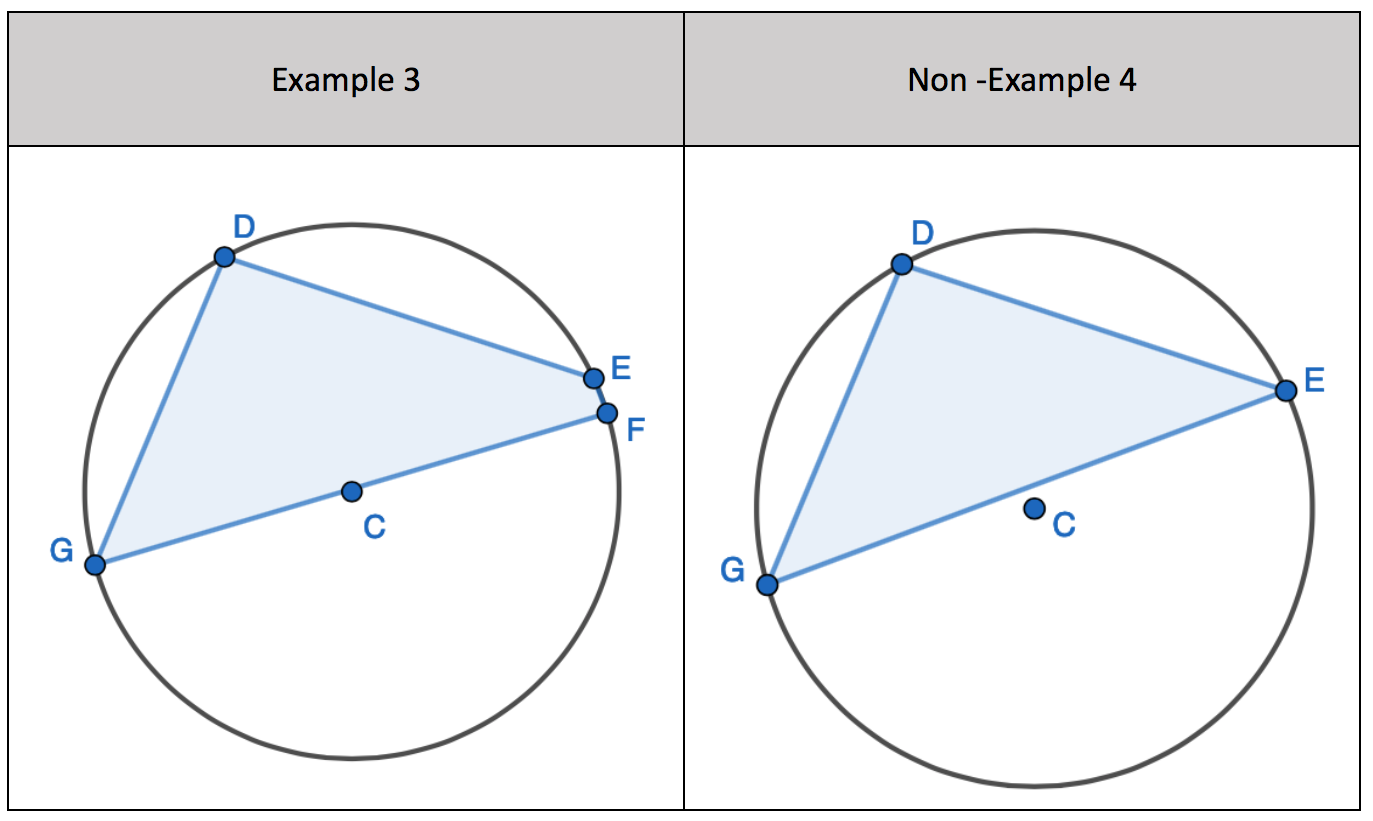
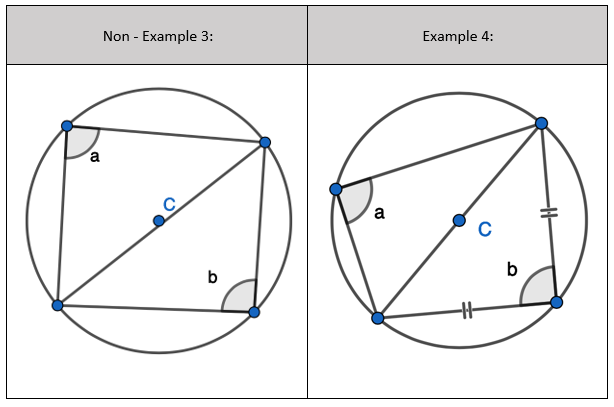
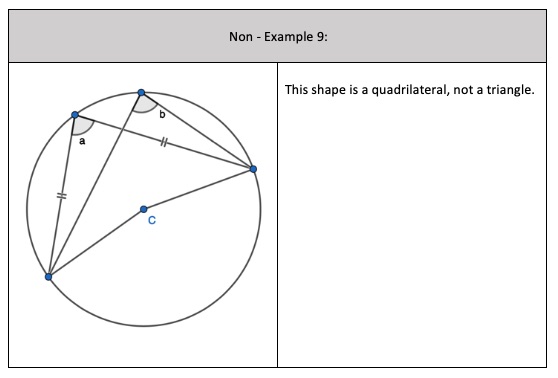
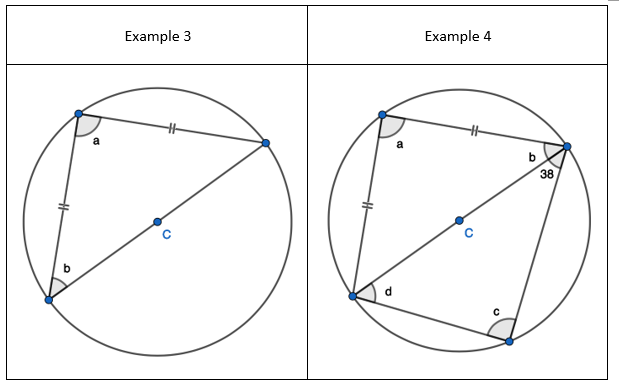
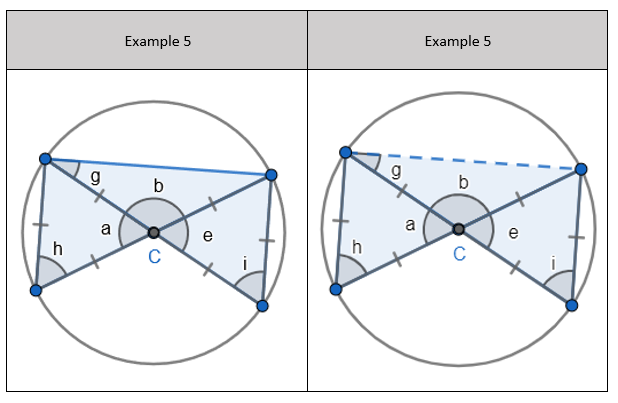
5. Pupils can see that there are two equilateral triangles meaning ‘a’, ‘h’, ‘e’ and ‘I’ are all 60 degrees. I would mention that angle ‘h’ and ‘I’ are equal because those angles at the circumference are in the same segment.

  1. State ‘f’ is 37 degrees because angles at the circumference made in the same segment are equal. Find ‘g’ because the total of ‘f, ‘g’ and 29 degrees is 90 degrees because the triangle is right angle triangle. We know this because the hypotenuse of the triangle is also the diameter of the circle. Find ‘a’ using the basic angle fact of angles in a triangle sum to 180 degrees. State that ‘a’, ‘b’ and ‘e’ are all angles at the circumference made in the same segment. They are equal to 60 degrees.

Booklet attached below:

https://drive.google.com/open?id=1gaJvcsgimiHEyPVho-U3NWyZ2hWmuj95


Pt 3 Reattempting Circle Theorems

This blog post is the third of a series ‘Reattempting Circle Theorems’. We have looked at the following circle theorem and a non-circle theorem:

Circle Theorem #1: A right angle triangle in a semi-circle

Show that: Two radii and a chord form an Isosceles Triangle

We will now look at the next circle theorem:

Circle Theorem #3: A cyclic quadrilateral’s opposite angles add to 180 degrees

The booklet attached below follows the same structure:

  • Starting with the circle and outlining its features to deduce the circle theorem
  • Show a series of examples and non-examples of the circle theorem

  • Start with examples to find the missing angle(s) of
    1. the circle theorem in isolation
    2. interleaved basic angle facts
    3. interleaved previously taught circle theorems
  • Algebraic section (In this case, I haven’t attached it because I would do it differently now)

Introducing the Circle Theorem: A cyclic quadrilateral’s opposite angles add up to 180 degrees

Here is a circle:

Then we draw four points on the circumference of the circle:

We draw a straight line between one point and the next point on the circumference. We can go clockwise or anti-clockwise when choosing which points to connect:

And keep going:


All four corners of the four-sided shape lie on the circumference. This is a cyclic quadrilateral.

Here we have a four-sided shape. A quadrilateral where all four corners of the shape lie on the circumference of the circle. Here is another example:

All four corners of the four-sided shape lie on the circumference. This is a cyclic quadrilateral.

Here is an example of a quadrilateral but NOT all its corners lie on the circumference. Here one of the corners is the centre of the circle; this isn’t on the circumference of the circle. This is not a cyclic quadrilateral.

All four corners of the four-sided shape DO NOT lie on the circumference. This is NOT a cyclic quadrilateral.

Here we do have four corners of a shape on the circumference of the circle, but the shape doesn’t have four sides. This is not a cyclic quadrilateral.

Examples and Non-Examples of the Circle Theorem

Specify the language to state the correct circle theorem examples and its non-example.

For example:

“All four corners are on the circumference then we have a cyclic quadrilateral.”

For a non-example:

“Not all four corners on the circumference then we don’t have a cyclic quadrilateral.”

“The shape doesn’t have four side lengths even though all four corners are on the circumference. We don’t have a cyclic quadrilateral.”

Find the missing angle using the Circle Theorem

At this point, I would state the steps to find the missing angle before looking at a few examples. Pupils can follow the steps if they lose track during the example explanation.

Here are the steps:

  1. Check that the shape is a four-sided shape and all four corners lie on the circumference
  2. Identify the opposite angles in a cyclic quadrilateral
  3. If you have one the opposite angles, then subtract from 180oto find the unknown missing angle

Here are the teacher examples to find a missing angle or angles. The variation between the examples isn’t evident here. I try to change one change at a time between the ‘I do’, and the ‘We do’ example. I’ll explain the thinking behind choosing each example:

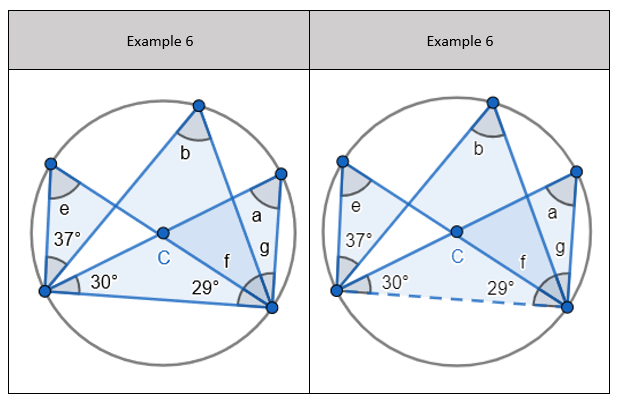
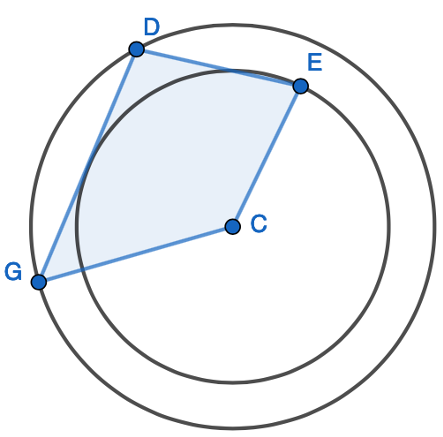
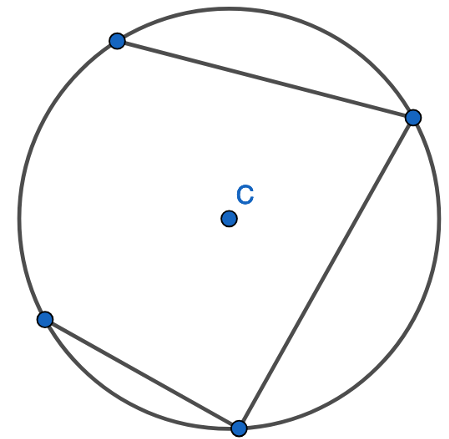
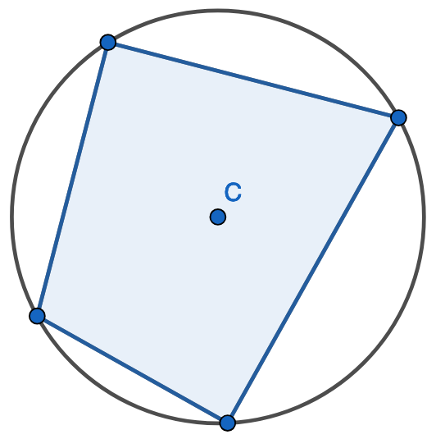
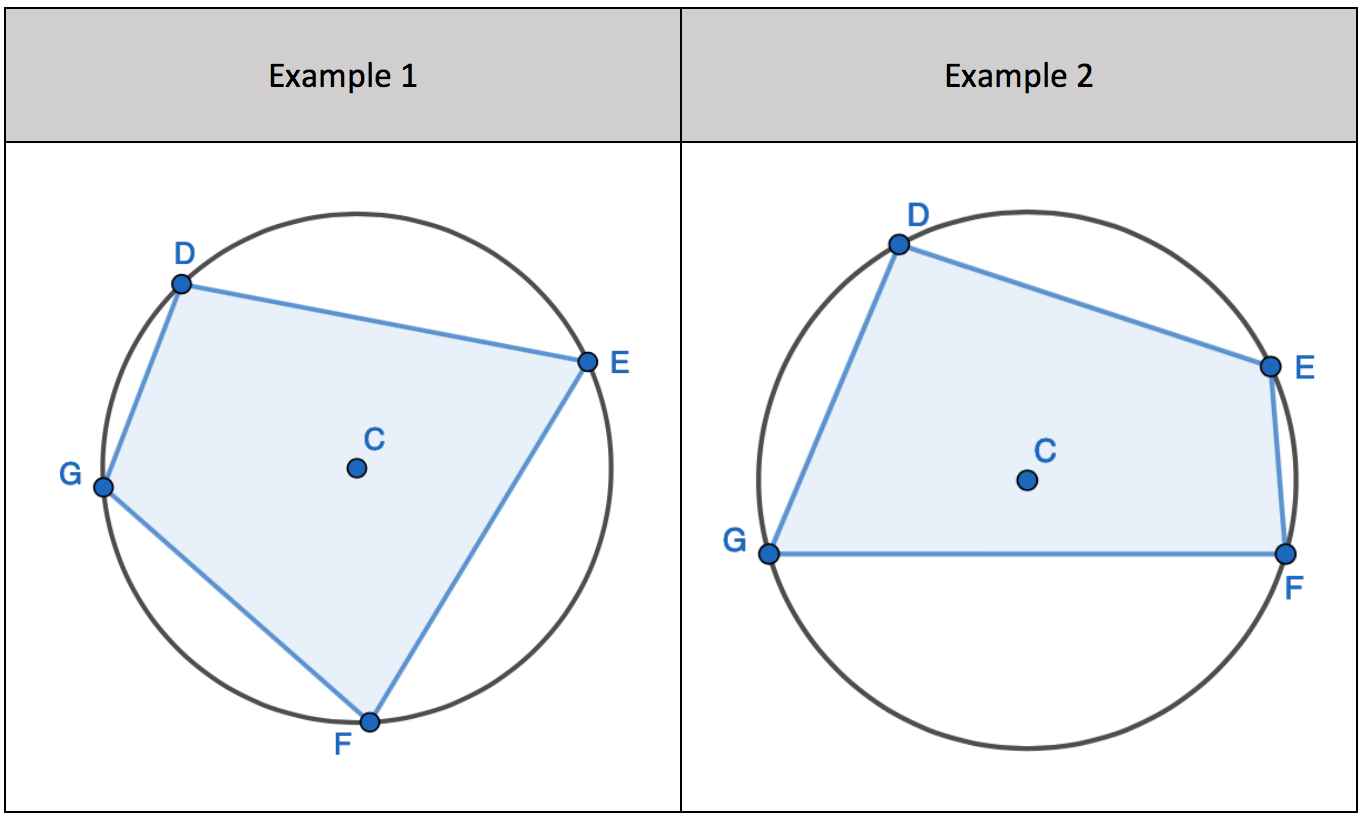
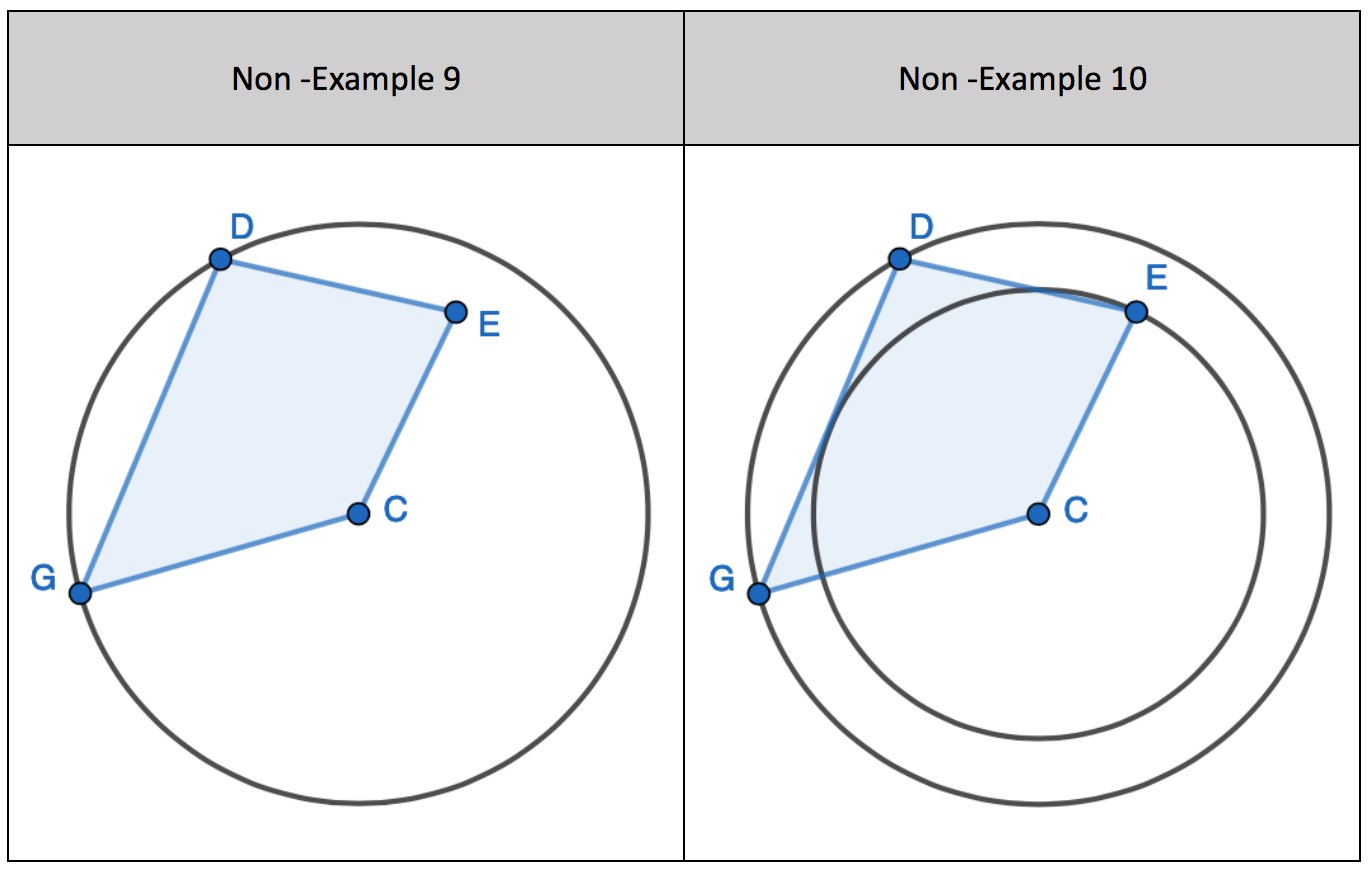
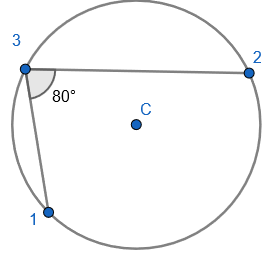
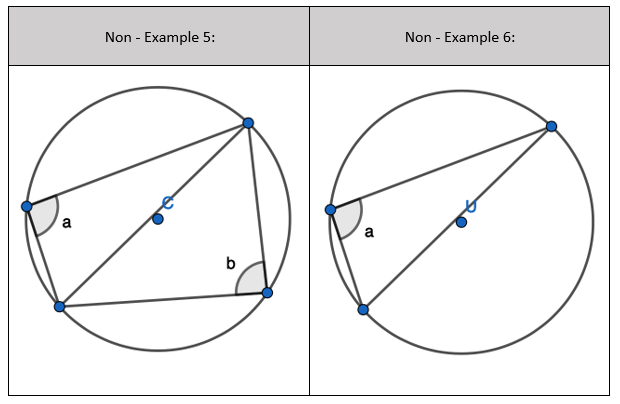
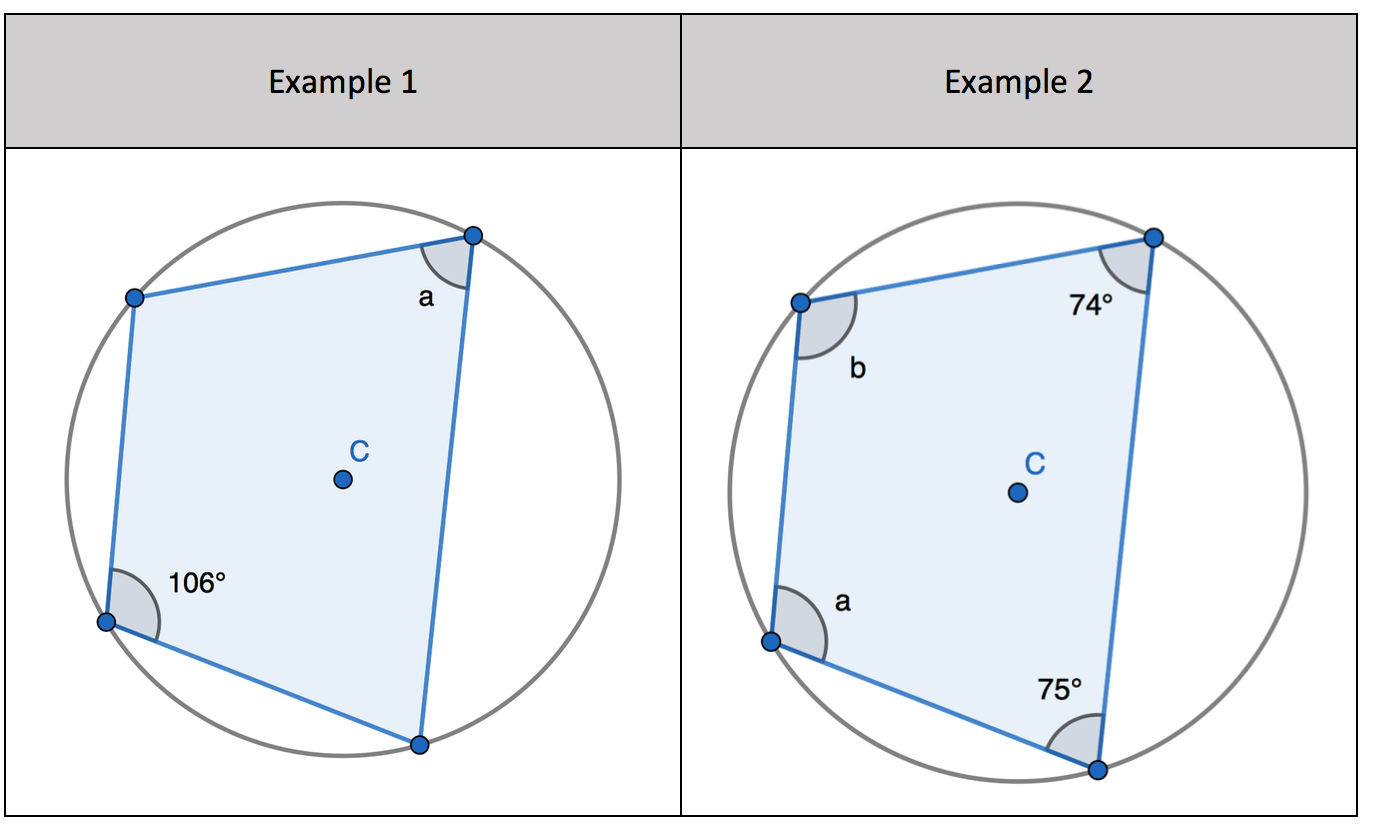
1. Find the opposite angle in the quadrilateral by subtracting the angle you have from 180 degrees

2. Find the opposite angle in the quadrilateral by subtracting the angle you have from 180 degrees. Two incomplete pairs of opposite angles.

3. Find the opposite angle in the quadrilateral by subtracting the angle you have from 180 degrees

4. Using basic angle facts. Find one of the opposite pair of angles in the quadrilateral to find the second missing opposite angle.

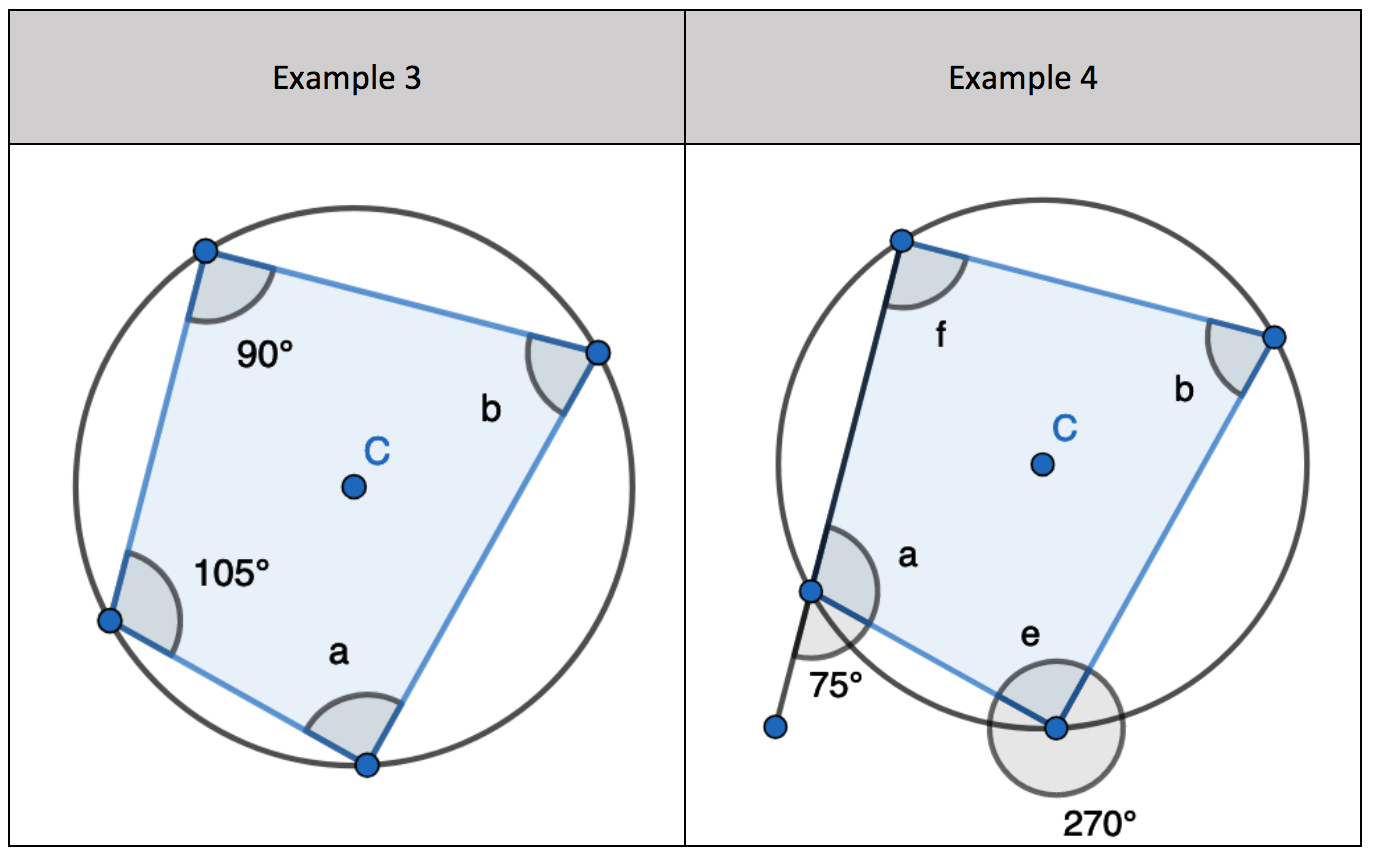
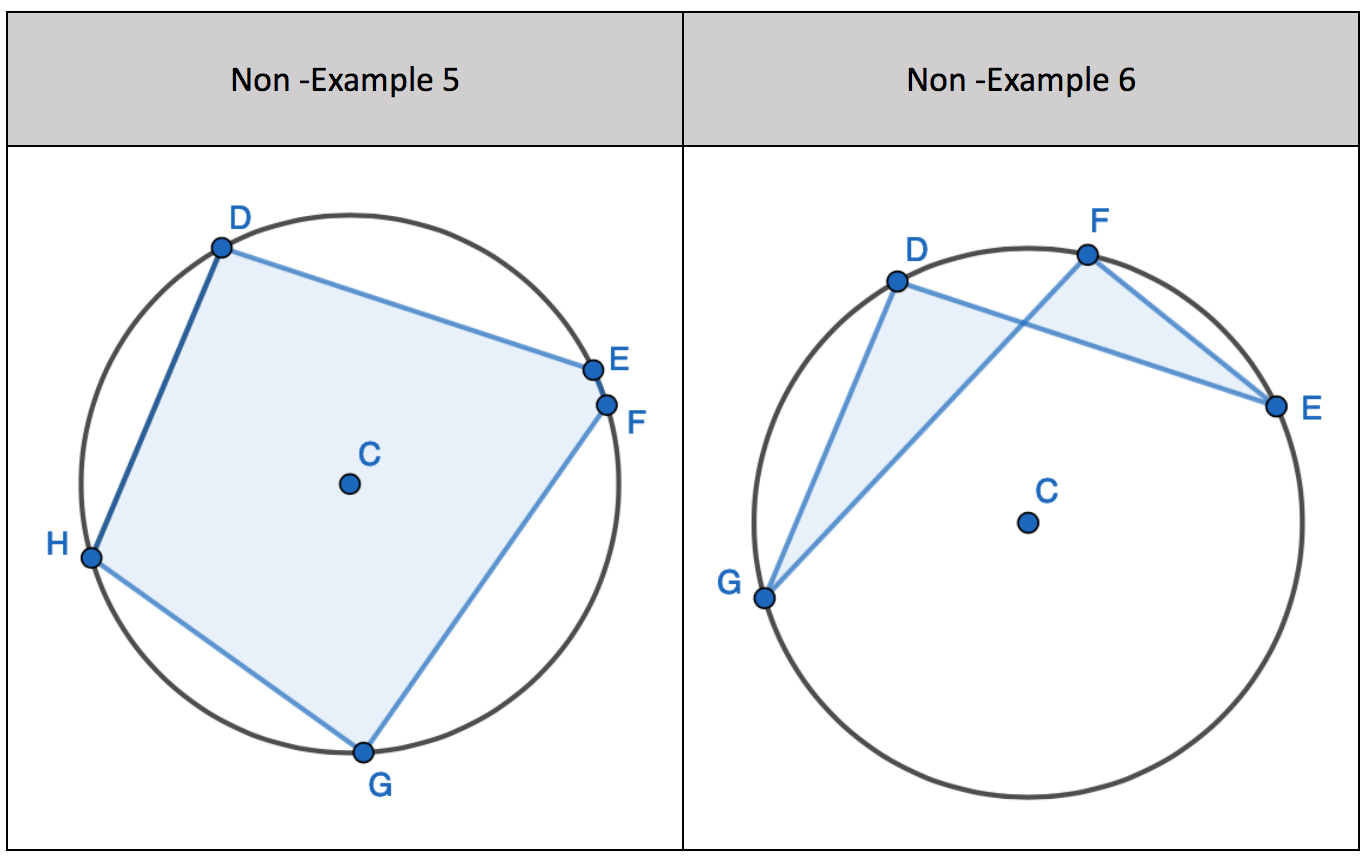
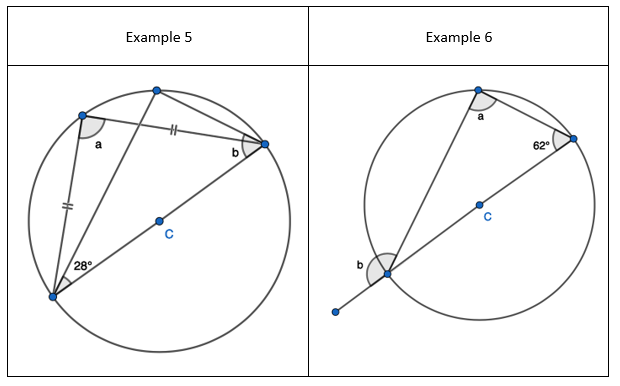
5. Interleaving the first circle theorem – A right angle triangle in a semi-circle

  • Identify ‘a’ and ‘b’ as a right angle of 90 degrees.
  • Find ‘c’ by adding 90 and 43 degrees and then subtracting from 180 degrees.

6. Interleaving the first circle theorem – A right angle triangle in a semi-circle. Interleave the ‘show that’ feature of two radii and a chord form an Isosceles triangle

  • Identify ‘h’ as a right angle of 90 degrees.
  • Identify the total of ‘a’ and ‘f’ as 90 degrees.
  • Find ‘a’ as 29 degrees as it is one of the two equal angles in an Isosceles triangle
  • Find ‘b’ by adding the two equal size angles and subtracting the result from 180 degrees.
  • Find ‘e’ by subtracting ‘b’ from 180 degrees using the basic angle fact that angles on a straight-line sum to 180 degrees.
  • Find ‘g’ and ‘f’ by subtracting ‘e’ from 180 degrees and dividing the result by 2.

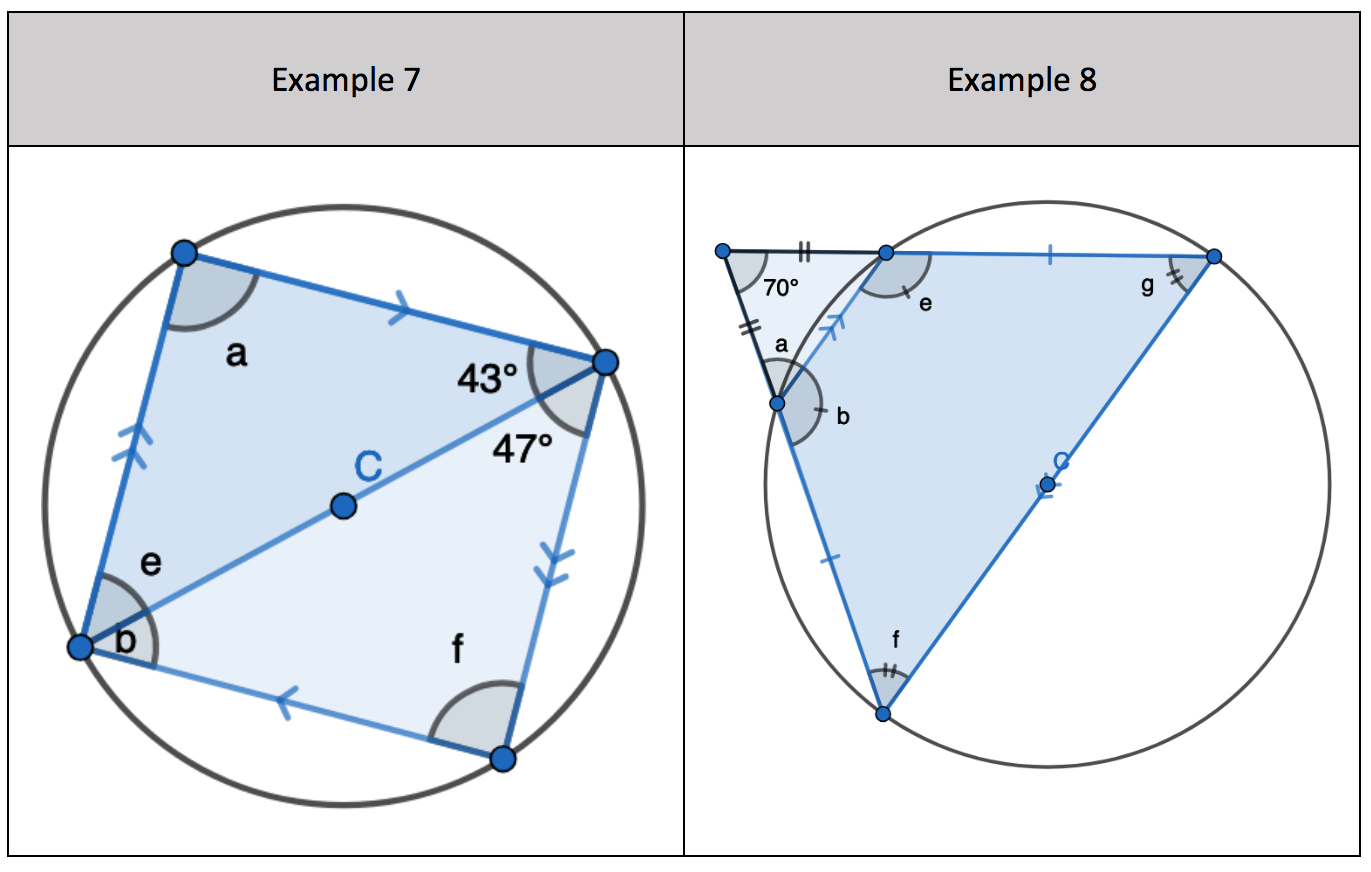
7. Interleaving the first circle theorem – A right angle triangle in a semi-circle

  • Identify ‘a’ and ‘f’ as a right angle of 90 degrees
  • Find ‘e’ by adding 90 and 43 degrees and then subtracting from 180 degrees
  • Find ‘b’ by adding 90 and 47 degrees and then subtracting from 180 degrees
  • Different approach: Interleaving angles on parallel lines to determine ‘b’ as an alternate angle to 43 degrees. And ‘e’ as an alternate angle to 47 degrees.

8. Interleaving basic angle facts to

  • Find ‘a’ since the triangle is an Isosceles triangle
  • Find ‘f’ and ‘g’ as they are corresponding angles to ‘a’
  • Find ‘b’ by subtracting ‘a’ from 180 degrees since angles on a straight-line sum to 180 degrees
  • Find ‘e’ since its equal to ‘b’ because the shape is an Isosceles trapezium.

Booklet attached:

https://drive.google.com/file/d/1RAQIj84hPiPHuwptk-L98kd_KX0aEZ-c/view?usp=sharing


Pt 2: Reattempting Circle Theorems

This blog post is a follow up of the ‘Reattempting Circle Theorems’ blog post series. Last time we looked at this circle theorem:

Circle Theorem #1: A right angle triangle in a semi-circle

We will now look at a potential non-circle theorem. I’m opening this up for debate. I’ve had a look around online and in articles whether ‘Two radii and a chord form an Isosceles triangle’ is considered a circle theorem or not. Right now, I’m going to state it is not a circle theorem but instead the start of a proof about the perpendicular bisector of a chord. Thank you to Ed Southall for clarifying. Follow him – he’s my geometry go to! I am flexible to change my mind.

I deliberately included this after the first circle theorem so I could interleave it into new problems.

If I have a triangle where two lengths are radii and the third length is a chord, then it will be an Isosceles triangle. Two radii connected by straight line at both endpoints form an Isosceles triangle. The two of the side lengths are of equal measure.

I hope all pupils will be able to access a mathematical problem like this:

Show that: Two radii and a chord form an Isosceles Triangle

Here is a diagram for you to see this circle theorem form:

I have a circle where I draw one radius:

I draw another radius:

I draw a straight line between the two endpoints of each radii which are on the circumference of the circle:

I then would show pupils that I can mark the two radii to show they are of equal length. I would show that the two equal angles of the triangle are of same size. And even mark the angles with identical values. I would do this live rather than with static images:

Now, there are two types of angles you can find:

1) One of the two equal angles

2) One non-equal angle

To find one of the equal angles, you’ll have the non-equal angle. Here are the steps:

  1. 180 degrees – non-equal angle
  2. Divide the result by 2

To find the non-equal angle, you’ll have one of the equal angles. Here are the steps:

  1. Double one of the equal angles
  2. 180 degrees – (double one of the equal angles) = Non-equal angle

The structure of the booklet is the same as outlined in the previous blog post. There are ‘I do, We do’ examples and then a practice exercise at the end. Since this isn’t a circle theorem, I’m not going to show a selection of examples and non-examples. But, I’m interleaving the first circle theorem into the sequence.

Finding the missing angle

Here are the teacher examples to find a missing angle or angles. The variation between the examples isn’t evident here. I try to change one thing at a time between the ‘I do’ and the ‘we do’ example. I’ll explain the thinking behind choosing each example:

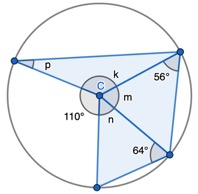
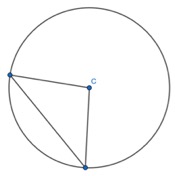
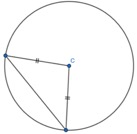
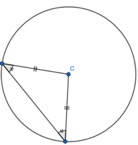
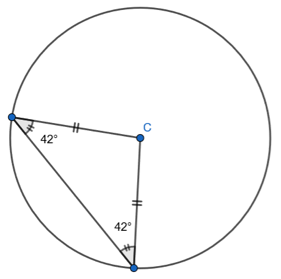
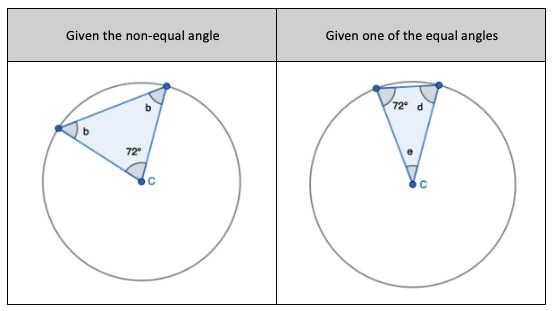
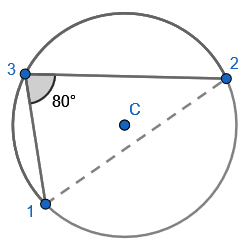
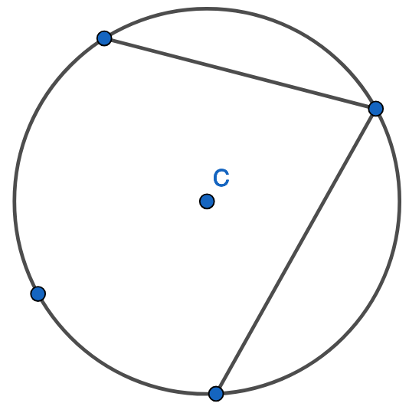
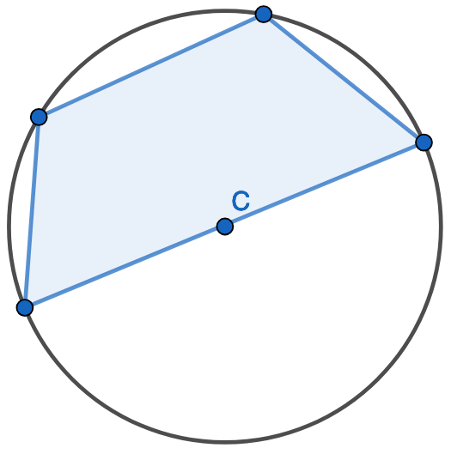
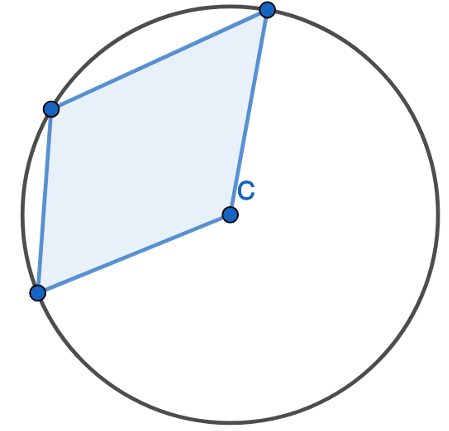
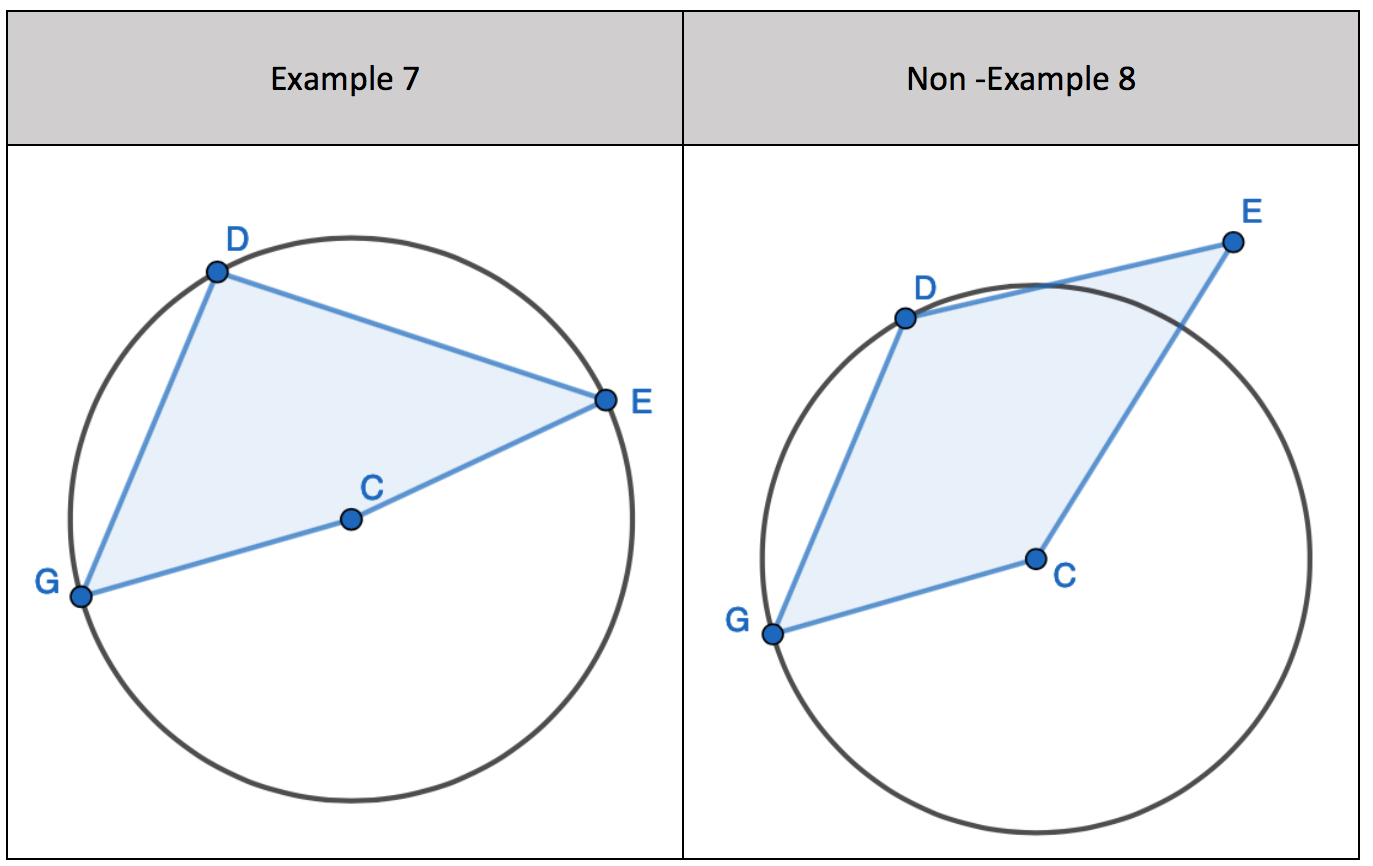
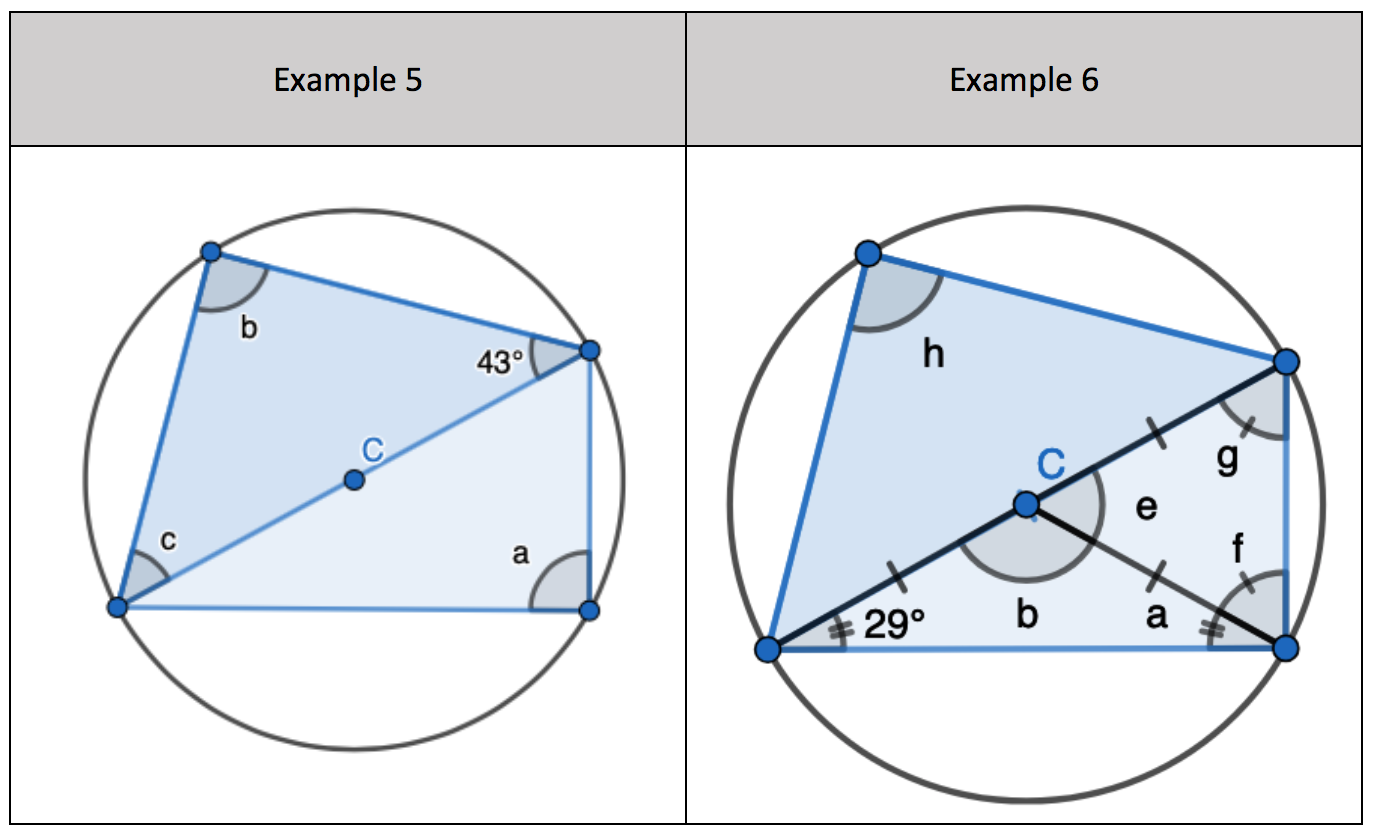
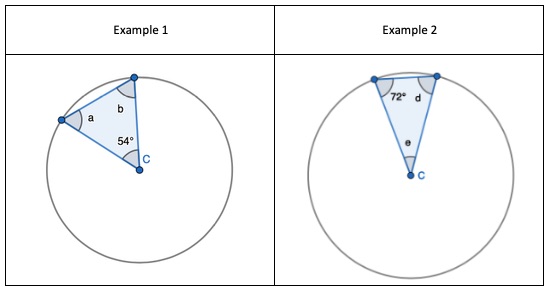
1. Show that two radii and a chord form an Isosceles triangle, only. Given the non-equal angle, find the one of the two equal sized angles.

2. Show that two radii and a chord form an Isosceles triangle, only. Given one of the equal sized angles, find the missing non-equal angle.

3. Interleaving the angle fact: angles around a point sum to 360 degrees. Find the non-equal angle to then find one of the two equal sized angles.

4. Two Isosceles triangles sharing a length. One triangle you are given one of the two equal sized angles to find the non-equal angle. Once you’ve calculated ‘m’ you can use the basic angle fact that angles on a straight-line sum to 180o to find ‘p’.

5. Same as Example 4 – angles needed to find before ‘u’ are not marked. Same logical steps. Also, can use the fact that angles on a straight-line sum to 180 degrees to then find ‘u’.

6. Interleaving the first circle theorem – A right angle triangle in a semi-circle

  1. Identify ‘a’ as a right angle of 90 degrees.
  2. Find ‘e’ by adding 48 and 90 degrees and then subtracting from 180 degrees.
  3. Find ‘b’ by finding the non-equal angle of the triangle using 180 – 58 degrees, and dividing the result by 2

7. Three Isosceles triangles.

  1. Find ‘m’ and ‘n’ by doubling one of the two equal sized angles of each triangle and subtracting from 180 degrees.
  2. Find ‘k’ by using the fact that angles around a point sum to 360 degrees.
  3. Use ‘k’ to find angle ‘p’ by subtracting the non-equal angle and dividing the result by 2.

8. Two Isosceles triangles that are not sharing a side length:

  1. Find ‘u’ using the one of the two equal angles of the triangle
  2. Find ‘w’ by doubling the triangle’s two equal angles and subtracting from 180 degrees.
  3. Find ‘x’ by doubling 64 degrees and subtracting from 180 degrees.
  4. Find ‘y’ by using the angle fact that angles around a point sum to 360 degrees.
Algebraic Application

Another reason why I wanted to include this feature because it allows pupils to apply prior knowledge from the topic of solving equations. There are two problem types that we will have to deal with:

  • Two equal angles labelled – solve equations with unknowns on both sides

In this case, the variable used for the two equal angles represented as expression will be the same. It has to so we can form an equation with unknowns on both sides to find the value of the unknown. I then labelled the non-equal angle with a different variable. I did this because I didn’t want to make an error in choosing an algebraic expression which shared the same variable as the two equal sized angles.

  • All angles are an algebraic term, expression (same variable, not different) or number. Form equation and equate to 180 degrees

In the next problem type, I deliberately labelled the two equal sized angles with the same algebraic term or expression. This re-iterated that the two angles of the Isosceles triangle are equal. Given more time I would create more examples where the equal sized angles are labelled with different expressions sharing the same variable.

Is it possible for a mathematical problem be incorrect?

Thankfully, Tom Francome highlighted that I mislabelled one angle in a triangle with a different variable so the possibilities for that variable were endless:

I changed ‘4c’ to ‘4f’ so that all angles in this triangle share the same variable. We can then collect the algebraic terms and equate to 180o to find the value of the unknown. We can substitute the value of the unknown back into the algebraic term to find the size of each angle.

Booklet attached:

https://drive.google.com/open?id=1rJmM29WeIXfOTCAE-rBdcXAM36S_SLFL


Reattempting Circle Theorems

In January 2017, I wrote two blog posts on a selection of circle theorem resources. I was in my fourth year of teaching and I loved creating curriculum resources. I made the problems using activinspire because I hadn’t mastered Geogebra by that point. There were so many mistakes in the questions.

Some lovely teachers got in touch via DM and gave their friendly feedback. Others wielded their axe and punched me with mean tweets. Some others pretended to care by writing blog posts about the situation. As if they knew the cause behind my errors.

It wasn’t the best of times. But, I learnt that it is OK to make mistakes that you didn’t even know were mistakes. It highlighted that subject knowledge development is never ending.

What have I learnt from the experience:

  1. Using GeoGebra meant that I was able to draw the angles, so a 26 degrees angle looked like one. The largest angle was opposite the longest side length etc.
  2. I was able to check that all the angles within a triangle and a straight line totalled to 180s. And that angles in a quadrilateral or around a point totalled to 360 degrees.
  3. I was able to learn about construction invariance – something I didn’t know about. It is also something taught after A level Mathematics. My knowledge of school taught mathematics goes this far.
  4. Always have your work reviewed by a fresh pair of eyes. Ask a friend, a colleague etc.

I am familiar with Geogebra and enjoy using the application. Last year I re-created the circle theorem resources into a prepared booklet. I will release each circle theorem’s resources one blog post at a time.

Here are a few things to know about the resources that you are about to see:

  1. The first section is showing pupils how the circle theorem comes into existence. Starting with the circle and outlining its features to deduce the circle theorem. If I showed this in class, then I would do this live rather than using static images.
  2. I then show a series of examples and non-examples of the circle theorem. This helps pupils to identify a circle theorem on complicated problems.
  3. I start with examples which model the circle theorem in insolation. So, a pupil’s attention is on the theorem alone and identifying the missing angle.
  4. I then start interleaving basic angle facts in the circle theorem problems. E.g: angles in a triangle, straight line, right angle, isosceles triangle etc.
  5. In future circle theorem resources, you will see me interleave learnt circle theorems. This is to build gradual difficulty within the examples.
  6. There is algebraic section included at the end where angles are expressions.

One common question I get from the resources I make: which sets are the resources appropriate for?

My answer: all sets!

This isn’t a popular answer but it’s true. When you are teaching a concept for the first time the teaching should be the same for all sets. The only difference between high and low attaining pupils is the time taken to learn the concept. High attaining pupils recall prior knowledge and using it with fidelity compared to weaker pupils. I would teach a new concept explicitly with all pupils across the attainment spectrum. Can you imagine your low-attaining pupils finding the missing angles on this problem?

Introducing the Circle Theorem: A right angle triangle in a semi-circle

Here is a circle:


Draw a line from one point on the circumference, through the centre of the circle marked ‘C’ through to the opposite end on the circumference. This line is the diameter:

Teacher Language: Edge – Centre – Edge – check it is a straight line!

Draw a straight line to another spot on the circumference in one half of the circle from one end of the diameter:

Complete the three-sided shape (triangle) by drawing a straight line between the two unconnected points:

We have a triangle that is within a circle, and all the triangle’s vertices are on the edge of the circle. In other words, all the triangle’s vertices are on the circumference on the circle. The angle on the circumference, not touching the diameter is 90 degrees. It is a right angle. This is a right-angle triangle.

Introducing Examples and Non-Examples

Specify the language to state the correct circle theorem example and its non-example.

For example:

“If we have the longest side of the triangle as the diameter of the circle, then we have a right-angled triangle.”

For a non-example:

“If the longest side of the triangle is NOT the diameter of the circle, then we don’t have a right-angled triangle.”

The right angle is always touching the circumference! ‘a’ in the examples mark the right angle:

Finding the missing angle using the circle theorem

At this point, I would state the steps to find the missing angle before looking at a few examples.  Pupils can follow the steps if they lose track during the example explanation.

Here are the steps:

  1. Identify the right angle of the triangle
  2. Calculate the remaining interior angles by
  3. Adding the known angles
  4. Subtracting the result from 180 degrees

I usually do a ‘I do, We do’ set up when going through teacher examples. I will go through one example, and then pupils will go through a similar example. Same problem just different numbers. Completed on mini-whiteboards. Here is an example:

Example 1: Find the missing angles:

Here is the teacher sequence series only (‘I do’ only):

Example Breakdown:

  1. Circle theorem in Isolation – Find right angle and second missing angle
  2. Circle theorem in Isolation – Find right angle and second missing angle
  3. Interleave an Isosceles right-angled triangle
  4. Find the missing angles across two right-angle triangles. One being an Isosceles triangle.
  5. Same as example 4 but both triangles are in the same semi-circle
  6. Interleaving angles on a straight line

I included Example 5 to relate to a future circle theorem: Angles in the same segment are equal.

The algebraic section is incomplete. I thought I’d include it to see the variation theory applied in the examples.

Booklet: https://drive.google.com/drive/folders/1waAy8uS13nYNB-0s286cMLitxzWiV52O?usp=sharing


Varying Surface, Varying Depth

A month ago, I was resourcing for the topic ‘Expressions and Substitution’ for the Y9 Curriculum. A common approach is to substitute values to then solve a linear equation. I was keen to create a problem type when you substitute values you then have to solve a quadratic equation. Something like this:

On the surface you can see that the sequence of examples have one aspect varied at a time – value for ‘u’. This is inspired from Ference Marton’s Variation Theory (VT). One theory out of a body of educational research underpinning the United Learning Mathematics resources.

We use VT because perceived variation generates expectations for pupils. When these expectations are confirmed pupils’ perceptions are relevant mathematically. VT guarantees more clarity and honesty about mathematical ideas. Anne Watson and John Mason explain the meaning of ‘clarity of mathematical ideas’:

“the structure of examples through which learners encounter mathematically significant variation…attention can be focused on the use of variation to reveal the patterns and generalities which result from the techniques. This is the clarity.” ¹

This blog post will look at how VT is applied on the surface by changing the value of ‘u’, but also resulting in one change in the procedure of factorising a quadratic expression. This post is about the thinking behind creating an exercise like this, teaching it would be different post. To appreciate what follows here is the working out for part (a) and part (b)

On the surface, you can see that only initial velocity’s value changes. This is deliberate. Under the surface, here are the quadratic equations for each part to show that only one thing is changing between each part:

Pupils overgeneralise the procedure of substituting values to then solve a quadratic equation.

This example shows variation on the surface, but also with the quadratic equations solved so pupils develop mathematically relevant expectations that they will be solving a quadratic equation.

Here is the thinking process behind making this exercise:

Step 1:The kinematic equation where t is unknown results in solving a quadratic equation:

Step 2: I then thought what would have to be the unknown variable and the known variables? For the following formula to result in a quadratic equation t is unknown.

Step 3: In Y9, pupils can factorise a quadratic expression where all coefficients and constants are integers, and where the coefficient of ‘a’ in a quadratic equation of ax² + bx + c is equal to 1, only, not greater than or less than 1.

I have to be selective with each known variables’ values. Some are permissible and where some aren’t. The values that aren’t permissible would mean pupils factorising a quadratic expression where ‘a’ in ax² + bx + c is greater than 1.

Step 4: I looked at a sequence of quadratic expressions that can be factorised. Variable t will be the unknown rather than x to correspond to the kinematics equation:

So, here is the sequence I made:

There are a few expressions that I can’t factorise because of the context of the kinematics. During the solving process, I can’t have two values of  t being equal to a negative value. I can’t have this situation below:

In the context of kinematics, I can’t have negative values for time. Deciding which one to pick will confuse pupils.

I can have either: a quadratic expression where t would be both positive, or one value of  would be positive and the other negative. If there are two positive values for time, then that means the case is true at two different times. If one value of time is positive and the other is negative, then we accept the positive value for time only. In sum:

I can’t have a quadratic expression where the constant is positive AND the value of ‘b’ in ax² + bx + c is also positive.

I can have a quadratic expression where the constant is negative AND the value of ‘b’ in ax² + bx + c is either positive or negative.

Step 5: Back to the condition stated in Step 3 where the coefficient of ‘a’ in a quadratic expression of ax² + bx + c is equal to 1, only.

For this to be the case, I know that

The value of ‘a’ cannot vary, because pupils will have to factorise a quadratic expression where ‘a’ in ax² + bx + c is greater than 1.

Step 6: If we look back at the sequence of quadratic expressions, I have kept the value of the constant the same -24. And since,

The value of ‘a’ and ‘s’ remain the same throughout so the only varying value is for ‘u’ . Initial velocity can be positive or negative because it is a vector quantity.

In summary, on the surface of the exercise only the value of initial velocity varies at a time. Beneath the surface, one coefficient of the quadratic expression varies at a time. We are varying on the surface and deep within the mathematical problem. The two controlled dimensions encourages the learner to find the value of t:

  • By overgeneralising the process of substituting to then solve a quadratic equation.

Pupils focus on this overgeneralisation because they can factorise the quadratic expressions used. They learn the mathematical structure to substitute and solve a quadratic equation.

  1. References:

¹ Anne Waton and John Mason (2006) Variation and Mathematical Structure MT194

This exercise is under review. If you spot an error or have any feedback then please feel free to get in touch. 

Engelmann: Communicating through Covertization

Chapter 21, in Engelmann’s Magnus Opus, Theory of Instruction has changed the way I sequence worked examples to communicate a concept. This change took place greatly whilst I was at Michaela Community School when I started experimenting how to teach a UK Maths Challenge After school club. This is written about in more detail, here.

What I noticed, which may sound obvious, is that if you teach using examples which demonstrate the explicit features of a concept first and then progressively make those features implicit then the probability of success for each child in the learning process is greater. Engelmann refers to this as Covertization, “instruction that involves prompt shifts progressively from highly-prompted examples to unprompted examples.”

One example which will be detailed below, would look like this:

So a sequence of examples with explicit features transitioning to implicit features provides a process where pupils take overt steps to go from the first line of working to the last line of working. This means that the first example pupils encounter is structured within the simplest context.

Covertization results in examples that communicate a concept, or part of a concept, to be communicated in its most explicit and misconception-proof form.

The best way to appreciate covertization is to look at some examples which aren’t explicit.

Here are examples of fractions:

Here pupils can develop the following misconceptions:

  • all fractions have a one at the top
  • all fractions increase by ‘1’ in the bottom value
  • fractions get bigger when the bottom value is greater

Another example:

Here are examples of expressions commonly known as a ‘difference of two squares’

Here pupils can develop the following misconceptions:

  • The first term is always positive and a
  • The second term is always a constant
  • The second term is always an integer
  • The second term is always negative

What are the examples that I would use instead? To communicate an expression as a ‘difference of two squares’ I would start with the following, by stating that an expression must meet the following conditions:

  1. The coefficient of the variable is a square number
  2. The power of the variable must be even
  3. The power of the variable is never an odd number
  4. One term will be negative AND the other term will be positive
  5. The constant must be a value that can be square rooted.

Here are the following examples that I would use to reiterate the conditions stated above:

There are other examples that I could include here, however, what I’ve done is limit the examples to only meet the conditions I’ve stated. But look at the complexity of what pupils can identify as an expression known as a difference of two squares by selecting the examples that I have.

More importantly, I’ve started with an example which is explicit with the features that make an expression a difference of two squares. With the initial set of examples, you can see that the coefficient of 1 for isn’t obvious because pupils can’t see it, and ‘1’ as a constant isn’t an obvious example of a square number. Explicit features allow pupils to build a clear and misconception proof understanding of a concept, which is what makes an example powerful.

My final point, we can see that the process of covertization has highly prompted examples allowing pupils to respond successfully to writing the product of two expressions because the coefficients and powers provide them that structure. Starting the other way around with implicit features now looks unstructured and poorly guided for a pupil to know how to rewrite the expression as a product of two expressions.


Thank you, Siegfried Engelmann. Thank you.

On February 15th, the world lost an educator who spent his life developing an approach to accelerate the learning of disadvantaged pupils.

Engelmann was a Marketing Director turned Professor Emeritus of Education at the University of Oregon. He co-authored the famous ‘Theory of Instruction’ with Douglas Carnine and co-developed the term ‘Direct Instruction’ while working with Carl Bereiter. Through grant funding, they set up the Bereiter-Engelmann Pre-school which demonstrated the extent to which disadvantaged pupils could accelerate their learning in comparison to the performance of middle-class pupils.

I have spent the last couple of years becoming familiar with Engelmann’s work, taking aspects of his Theory of Instruction and applying it in my resource creation.

So, what have I learnt from Engelmann?

Answer: That a learner’s inability to respond appropriately to a form of instruction may not be the fault of the child; instead, it can be a problem with what she’s being taught.

This means it’s possible to teach a syllabus in a way she can respond to appropriately without dumbing it down. Here are the four things I keep in mind when creating resources that allow the highest percentage of pupils to understand the course content on the first attempt.

Atomisation

When I used Engelmann’s Connecting Maths Concept textbook series with my Year 7 and Year 8 Intervention pupils, I saw that Engelmann had taken a concept and broken it down into several sub-tasks. A sub-task is a small aspect of a concept. For example, A sub-task of how to add fractions with denominators would be finding the lowest common denominator. For a pupil to develop a flexible understanding of a concept, she needs to be taught as many sub-tasks of the concept and then shown the connections between each of the sub-tasks.

Atomising does exactly this. When I plan a unit of work, I take a concept and break it down into its sub-tasks, and I explicitly teach even the most nuanced aspects of the concept. For example, before I teach pupils how to factorise an expression, I teach pupils how to divide an algebraic expression by an integer, or by an algebraic term. Before I even do this, I teach pupils whether we can also divide an algebraic expression by a number or an algebraic term. An example is shown below:

Here are some examples, of where we can simplify the algebraic fraction:

Here are some examples of where we CANNOT simplify the algebraic fractions because we cannot divide ALL the terms in the fraction:

The value of this exercise is two-fold:

1)      Pupils are taught the most nuanced aspects of a concept which are usually the most difficult parts of the unit being taught. If the most challenging part of the concept isn’t taught explicitly then how can we expect pupils to attempt the most complex applications of the concept? We need to be more thorough and comprehensive than you might think and teach the most complex elements of a concept as well as the most basic.

2)      Pupils develop a flexible understanding of the concept because they can see the big picture. If you plan an entire unit rather than isolated lessons parts, you are more likely to teach as many sub-tasks as possible and not miss anything that’s essential to a student’s understanding. Missing out sub-tasks inevitably means you have to re-teach. Engelmann set up his textbook series to avoid the need to re-teach. If re-teaching is required, Engelmann provides appropriate correction and reinforcement exercises for each unit of work.

Sequencing the learning in the most effective manner

Engelmann’s Connecting Maths Concept textbook structures the content of a unit of work in just that sequence where the learning can be delivered most effectively. Engelmann believed that all future learning is dependent on prior learning and that there is an optimal sequence for each concept. Provided the lessons are sequenced in the most effective way, pupils always have the knowledge required to access the topic they are about to learn. At United Learning, scheme of work is structured and resourced with the same philosophy in mind. The underlying idea is that how effectively the pupils learn depends on the sequence in which they learn about a particular concept.

Scripting the lessons – Pedagogy

Scripting how you communicate the concept is essential. Now, many teachers despise scripted lessons, and some with good reason, e.g. the script they’re expected to follow is sub-optimal. Another reason for their scepticism is the belief that there is more than one optimal way to teach pupils about a particular concept. However, Engelman persuasively argues that there is only one optimal way to teach a particular concept – and his scripted lessons were field tested with tens of thousands of pupils and constantly being refined in response to feedback. Consequently, he was confident that the scripted lessons he and his colleagues developed embodied the most optimal learning sequences.

When I created my resources at Great Yarmouth Charter Academy, I started scripting how I would communicate concepts, to ensure pupils received the most effective and efficient form of instruction.

Then, I would think carefully about what method to communicate.  For example, I didn’t want to teach pupils how to add fractions using a method which was limited to only a few problem types, and then create a different method for another set of problem types. Instead, I tried to create methods that could be applied consistently to as many problem types as possible. This allowed pupils, especially the weakest, to master each concept in all its myriad complexity; evidenced by ever increasing scores in weekly quizzes.

Lastly, my scripted lessons were designed to give pupils the grounding they needed to articulate their understanding. Here is a video showing how a pupil using this knowledge to subtract negative fractions:

Low-stake quizzing and providing appropriate corrections and reinforcements

Engelmann’s Connecting Maths Concept textbook has many opportunities for pupils’ understanding to be tested. The script includes hundreds of questions for teachers to ask. Pupils are given exercises to try with the teacher, as well as independent exercises. Similarly, after every ten lessons, there are also small quizzes recapping what pupils have learnt, not only in the last ten lessons but in the previous 20, even 30.

At Charter, one visitor tallied the number of questions I asked pupils in a single lesson, and they totted up 76 questions in about 25 minutes. I learnt from Engelmann’s teacher scripts how to ask pupils’ questions which test their ability to recall prior knowledge, articulate their knowledge of a concept, to explain a misconception, etc.

In summary, I believe that Engelmann is one of the most important educators of the 20th and 21st Century. I think his work will stand the test of time. By applying his teaching principles to resource creation, I have helped my pupils learn more, and remember it for years to come.  My experience confirms, for me, that teacher quality is a function of the resources they have access toChildren are more likely to be successful with a teacher, who has access to exceptional resources, than a teacher who doesn’t, and never has.

Engelmann’s work has taught me more than any educator that I studied with during my PGCE and MA. My next post will look into the evidence for the effectiveness of Engelmann’s approach and the reasons why his work hasn’t been more influential.

After my podcast with Craig Barton, I have received many emails asking to share more booklets. I have attached the booklets that I made during my time at Charter. They aren’t perfect, and with my current workload, I am not in a position to refine them. However, I do think they are useful for teachers who want to start designing their own booklets. I used each booklet with all my classes. I hope they are helpful.

There will inevitably be mistakes in the booklets. I take full responsibility for any errors that you see.

https://drive.google.com/open?id=16UtxWsL3T5M2wz65YjwfRYyJ3BZSNZZp


« Older posts