HAPPY SUMMER FELLOW TEACHERS! I just finished being an AT (Assosciate Tutor) at Teach First’s Summer Institute .This blog is inspired by the amazing participants I have come across so far. Here is my advice to you, and it is on lesson planning. Keep it simple!
You have come across so many resources from card sorts, interactive games, metre square demonstrations etc. These are all very valuable and serve an academic purpose in supporting and engaging pupils but, to make your life easier for the first term, just keep your lessons simple.
What this means is keeping the structure of your lesson simple. You don’t have to make it complicated. You are just starting out – you have time to experiment and try new things: it doesn’t have to all be done within the first half term. So this is what I suggest.
1) Starter (Do Now)
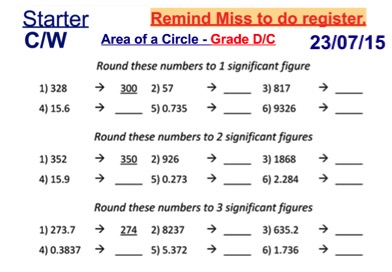
Figure 1 – Example of a Starter (Do Now)
This is a 7 – 10 minute activity for students to attempt within the first 10 minutes of the lesson in complete silence. This is to ensure that even if students come in dribs and drabs, those that are early are not wasting time, and that those that are late are still entering the lesson in a purposeful manner rather than disrupting those already learning. You need silence in the first 10 minutes to get all pupils into the academic mindset that they are entering a learning environment. Learning begins when they enter the classroom. You do not want the chaos of the corridor cutting into your teaching time. Demand it. Don’t budge!
I usually have an A5 print out of the activity for students to complete in their exercise book or on the sheet. I hand this to them as they enter the room – greeting them Good Morning/Afternoon. (See Figure 1) It has the date, title, level (depends on your whole school policy if still required) and C/W. This is because it is not academically purposeful for students to write it and underline it (Except for Wales) It saves learning time. They complete the activity, mark it and stick it in. Done!
2) Lesson brief and success criteria
“Thank you for completing your starter in silence and for marking your work with your green pen. Now, SLANT.”
I explain to students what I will be teaching them this lesson. (See Figure 2) I will elaborate on what we have learnt, and how what we are learning today is a continuation of that, and what we will learn in the following lessons too. This is to give students an awareness of the bigger picture. They like to know where they are going. I will have a success criteria to follow with examples so students can see what exactly their learning looks like. (See Figure 3)
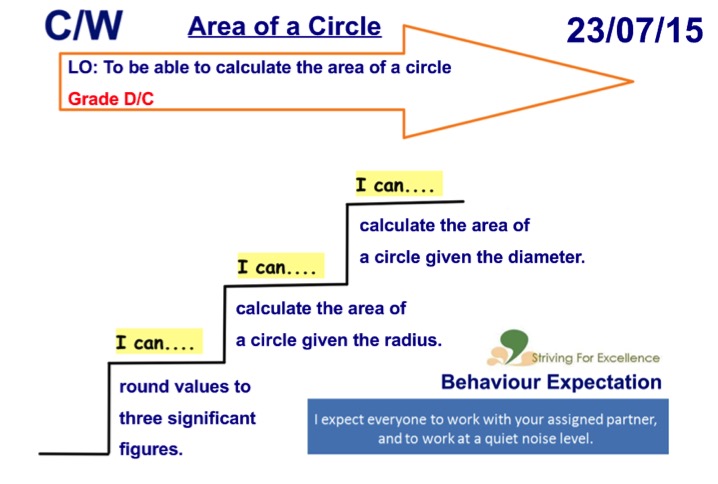

Figure 2 (Learning objective and outcomes) and Figure 3 (Success criteria)
This takes 3 minutes.
3) Exposition of worked examples
As a new teacher, it is best to assume as little as possible of what students can do. This is not to say you have low expectations of your pupils. I shall go into this in a follow up blog.
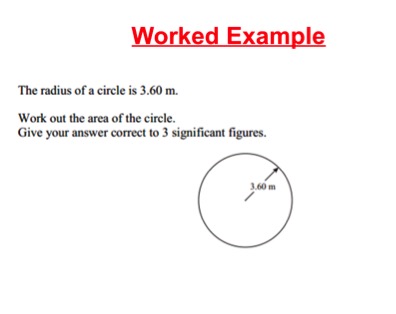
There is nothing wrong in teaching your students. Stand at the front at the board, teach your pupils how to calculate the area of a circle through a selection of well–sequenced worked examples.
Example 1: Calculating the area of a circle using the radius (Figure 4)

Example 2: Calculating the area of a circle using the radius (repeat for consolidation) (Figure 5)
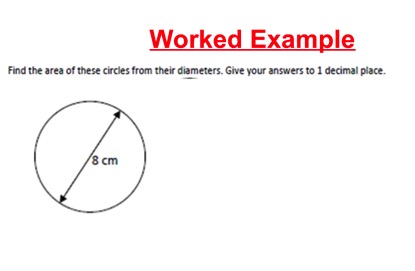
Example 3: Calculating the area of a circle using the diameter (Figure 6)
Teacher talk is not a bad thing. Do not assume that Y9 Set 2 have been taught how to calculate the area of a circle. Mine had not. If you demonstrate how to calculate the area of a circle through a selection of examples then students will make fewer mistakes because you have taught them. It is really simple. However, make sure their notes are exactly the same as yours (Board = paper – Teach Like a Champion Technique) because misconceptions come from misinterpretations of your exposition. They will not make mistakes if they duplicate what you have taught them. Later on, as their teacher, you can explore different calculations to the same correct answer but only, and I repeat only, after they have one concrete example.
In attempting a few questions independently, another benefit lies in students being able to use their worked example as an accurate reference point – they are becoming independent learners, slowly but surely.
4) AFL – Hinge Questioning – Mini – whiteboard activity
AFL (Assessment For Learning) serves the purpose of providing the teacher a sense of what has been learned. Using mini whiteboards is the best way to do that.
You ask a question. Students attempt it independently. They hide their answer. You countdown 5 – 4 – 3 – 2 – 1 and reveal. The whole class show their answers and you can identify who has understood what has been taught and who hasn’t understood the main teaching point. You clarify any misconceptions and then ask students to complete another question.
You should note that after 5 – 6 questions a greater percentage of students are getting the calculations and answers correct. If there are a few still struggling you go to them individually or gather them together to support them through the independent activity. This is a form of differentiation – See Bodil Isaksen’s blog for further reference.
5) Independent Task
“It is time for our independent task. I would like you all to complete all 20 questions in your exercise book. Demonstrate your thinking by showing all your working out. Refer to your worked example. I would like this to be completed in silence for the next 20 minutes. If you require any help then raise your hand and I shall come and help.”
This is the time for students to apply their understanding of the topic from the worked example by themselves. For thinking to really take place it needs to be conducted in silence. If we want our pupils to be independent learners we need to give them the time to work independently.
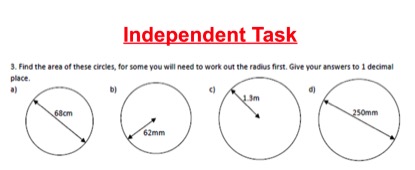
The value of this task is in the careful selection of questions. Do not give a bunch of random questions on the topic being assessed. Have 10 questions testing one element of their understanding. For example, calculating the area of a circle provided the radius. (Figure 6) Then change one variable, and now give them 10 questions on calculating the area of a circle provided the diameter. (Figure 7) Then in the next 10 questions, vary the questions on calculating the area of a circle given the radius then the diameter so students have to now differentiate which calculation they need to carry out in order to calculate the answer depending on what information is provided by the question. (Figure 8)
This was discussed by Kris Boulton during his lectures at Summer Institute, he talked about the variability effect.
Figure 6 – Independent Task 1 – Calculating the area of a circle given the radius.
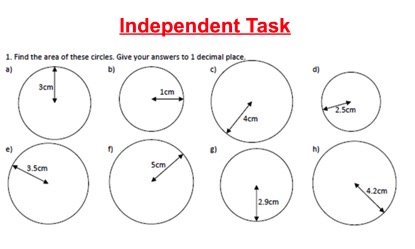
Figure 7 – Independent Task 2 – Calculating the area of a circle given the diameter.
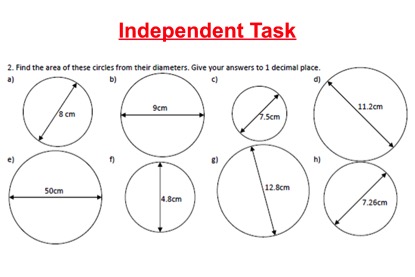
Figure 8 – Independent Task 3 – Calculating the area of a circle given the diameter or the radius.
Their ability to differentiate between how to start the problem is only possible through trying 10 questions straight on calculating the area of a circle using the radius, then 10 questions using the diameter.
Consolidation is not a bad thing. Students learn through repetition.
6) Self or Peer assessment with green pens.
Go through the answers – or display the calculations.
“3 or more correct then please raise your hand, 6 or more correct, 9 or more correct etc…”
I learnt this from my KSA interview and I will never forget it. Students who got only a few correct or a few completed feel great when their hand stays up with the rest of the class. Once you carry on it is more noticeable to you the children whose hand goes down. Students feel great when they are keeping their hand up because they got so many questions right. Rather than counting the opposite way.
7) Exit ticket – this can be your plenary effectively.
This is another form of AFL. It is one or two questions. It tests them on what has been taught. For example, one question on calculating the area of a circle using the radius, and another with the diameter. Pupils complete it in silence. They write their name on it. You collect it and mark it. It takes 5 minutes to mark a class set and it informs you how each pupil has performed in that lesson. You can then support students the following lesson or clarify any whole class misconceptions in the starter. (Figure 9 – see below)

It is simple if you keep it simple. Bring in everything you have learnt when it is required and where it serves an academic purpose for your pupils. You will be great. Be confident. Work hard.
Leave a Reply
You must be logged in to post a comment.