Conception of the good

Insights into our current education system

Category: Uncategorized (page 2 of 7)

Teaching an Inquiry Maths Problem

In February 2018, I heard Andrew Blair speak at a CPD event about Inquiry Maths. Andrew is a Head of Maths and founder of his website Inquiry Maths where teachers can gain access to ideas about teaching Mathematics using the Inquiry Maths model.

Andrew and I tend to disagree over the best pedagogical approach when teaching Mathematics, but we agree in teaching many of the problems that he has shared on his website. When I create resources, I check out different sites for ideas, and I regularly check Andrew’s website. It’s fantastic! When I saw Andrew speak at this CPD event, he showed a mathematical inquiry task that I made a mental note to include in my resourcing for the following year. The problem is below:

40% of 70=____% of _____

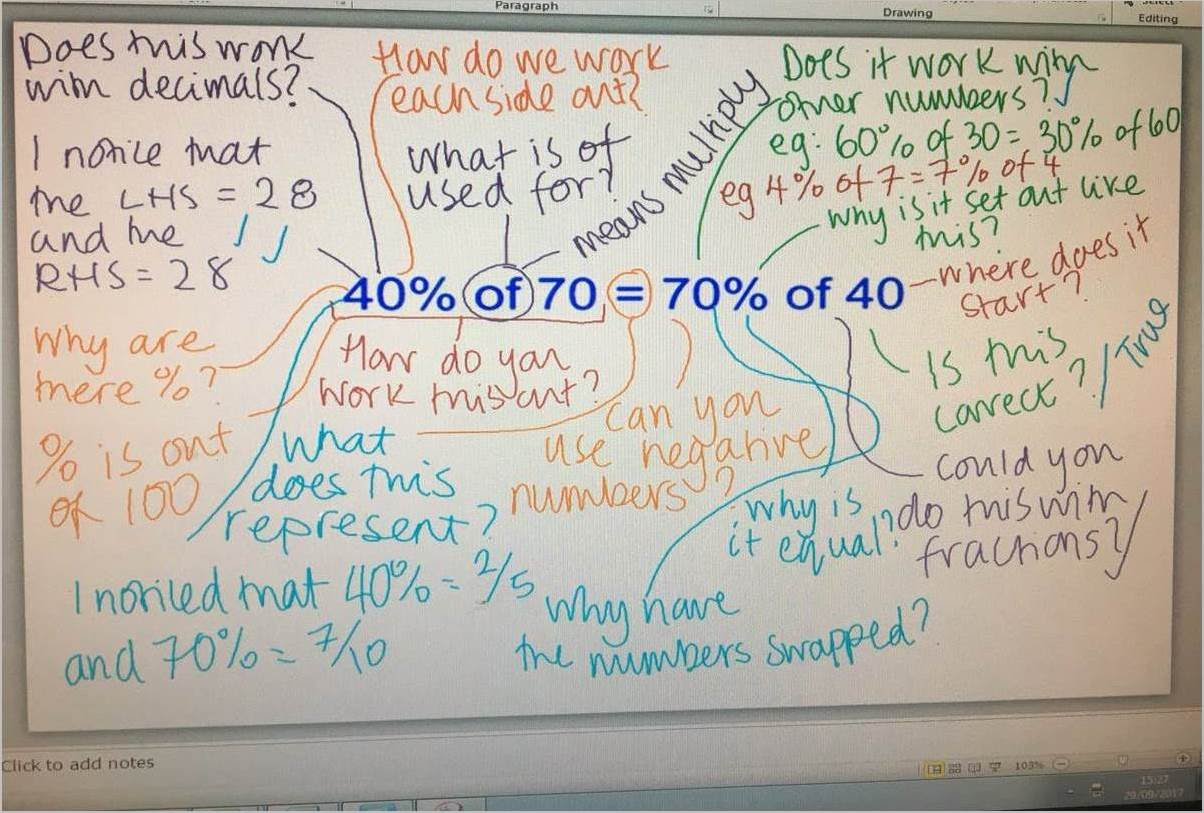
I love this type of mathematical problem. There is so much mathematics that needs to be communicated, and I would recommend readers to check out Andrew’s page on this inquiry. At United Learning I’ve finished the Fraction, Decimals and Percentage booklet for the Y8 curriculum and I’ve made resources for this type of mathematical inquiry to be shared with the kids.

Here is an example of how I broke down the teaching sequence so all pupils can access a problem like this but also support all pupils to attempt more complex forms as well. 

The teaching sequence is designed to increase the probability that all pupils can be successful in learning the subject content. 

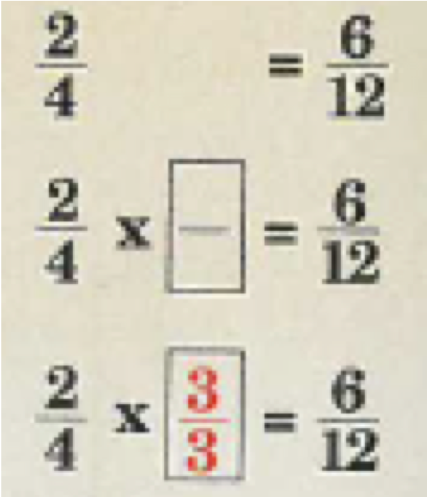
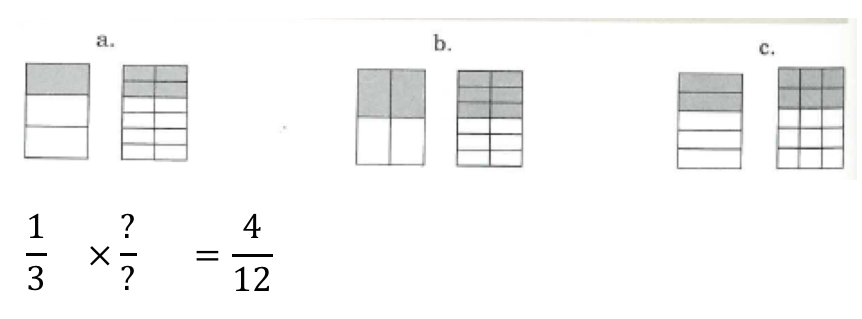
1) Showed a multiplication model for the following problem types

I have listed some of the potential decimal multiplication calculations and then demonstrated how to draw the model for the equivalent decimal multiplication calculation:

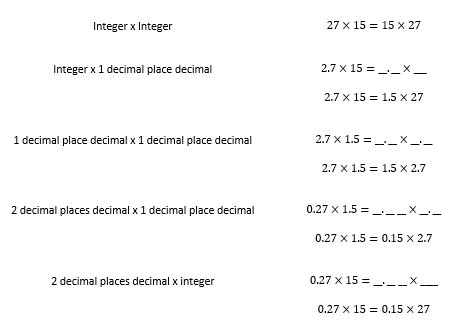
Pupils are only shown the first line because they are taught that the mathematical model of rewriting the decimal multiplication calculation.

A few points: I’ve deliberately kept the position of the mixed number or decimal and the integer in the same place within the calculation. In the second example, the first term of the calculation is a mixed number and the second is an integer, it is the same on the right-hand side of the equal sign. This is because I want pupils to focus on the digits changing position, and that only. Everything else is kept constant.

This is how I would communicate the model in the classroom to pupils:

I am multiplying a two decimal places decimal by an integer, so my equivalent calculation will have a two decimal places decimal and an integer.

I would get kids to draw the underlines to show me how their equivalent calculation would look. I have done this because learning the mathematical structure of the calculation is another thing a pupil needs to learn. This also reduces the likelihood of a future error caused by pupils by not knowing whether the calculation will have an integer and a decimal, or an integer or a decimal, and how many decimal places the decimal will have.

2) Introduce the steps to go from the problem to the equivalent calculation

a) Rewrite decimal place structure
b) Fill in the digits from the right side
c) CHECK: Multiply out both sides of the calculation to see that the result is the same

In my teaching, I write the generalised steps for the calculation pupils are about to do because they can see that even if I am rewriting a multiplication calculation with

  • an integer and decimal or;
  • two decimals or;
  • decimals with the same number of decimal places or;
  • decimals with a different number of decimal places

the generalised steps remain the same.

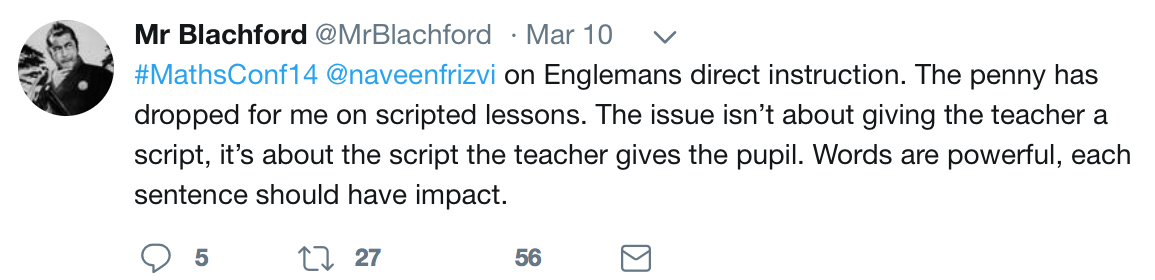
Generalising method stops is something that Siegfried Engelmann calls ‘Logically Faultless Communication’ which has been blogged about here.

A logistical thing, it also allows pupils to follow the steps better if they can flicker their eyes from the live worked example demonstrated by the teacher and the steps already written on the board.

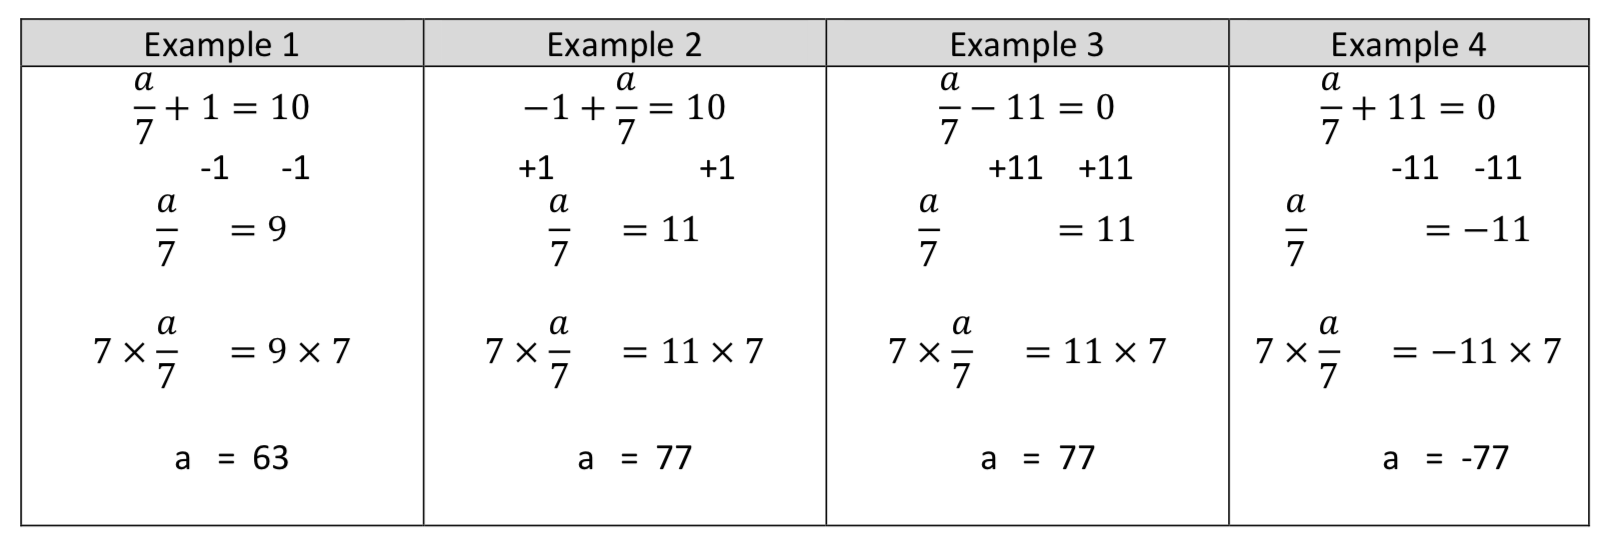
3) Introduce the Example-Pupil attempt sequence

At this point, I then design the teacher-led worked examples and the pupil attempt questions. The problem type that the teacher goes through and the pupil goes through after seeing the teacher demonstrate the same problem type.

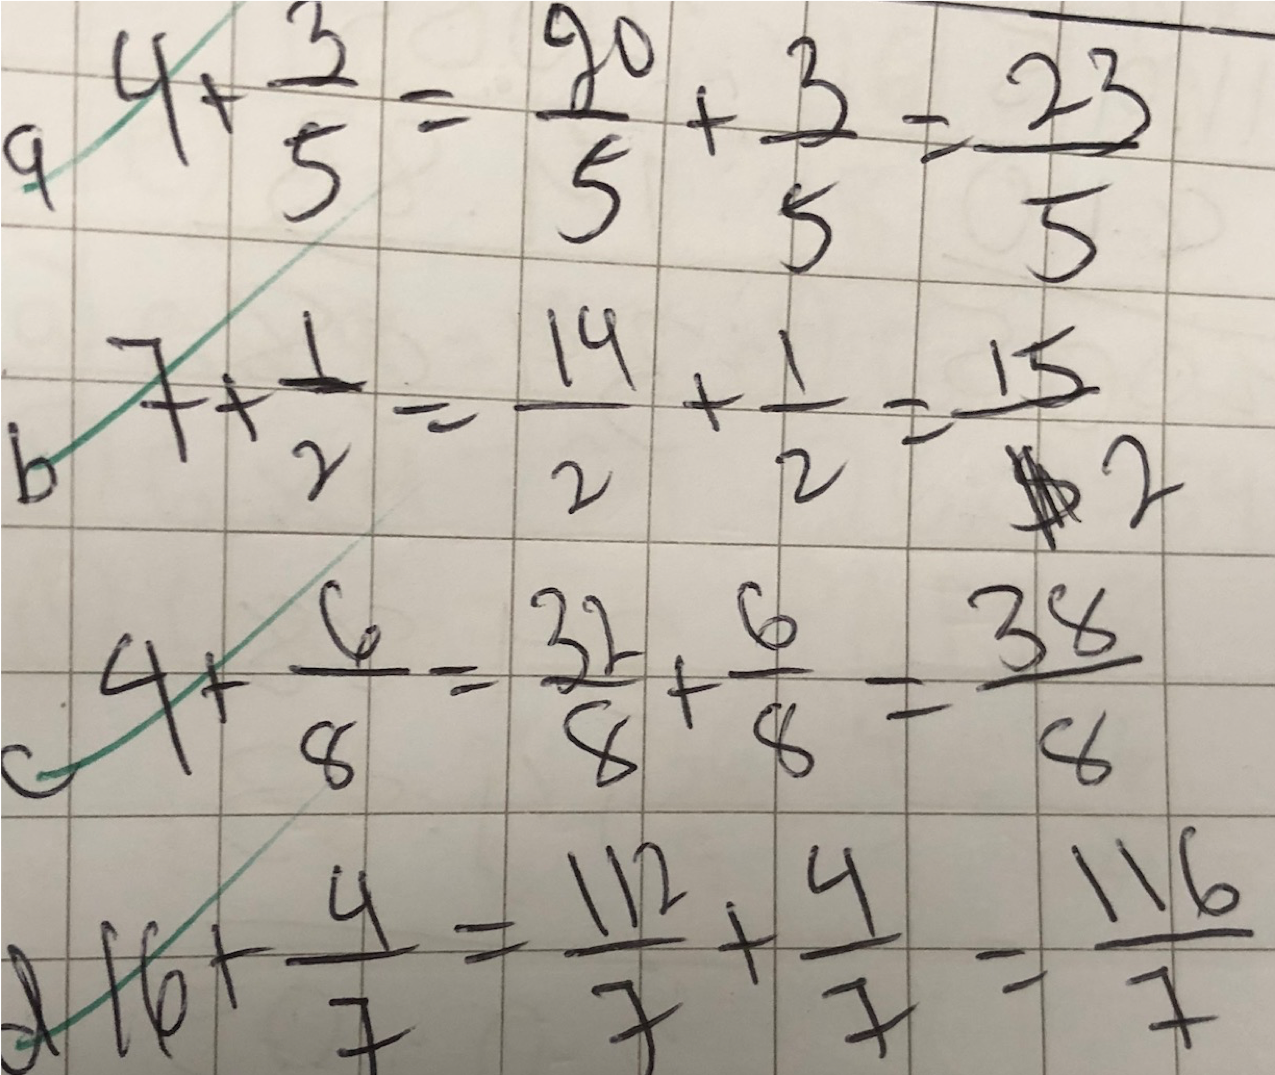
Here is the sequence:

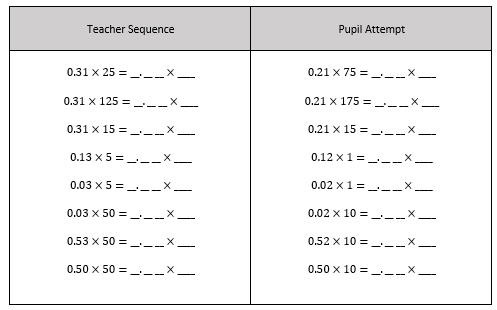
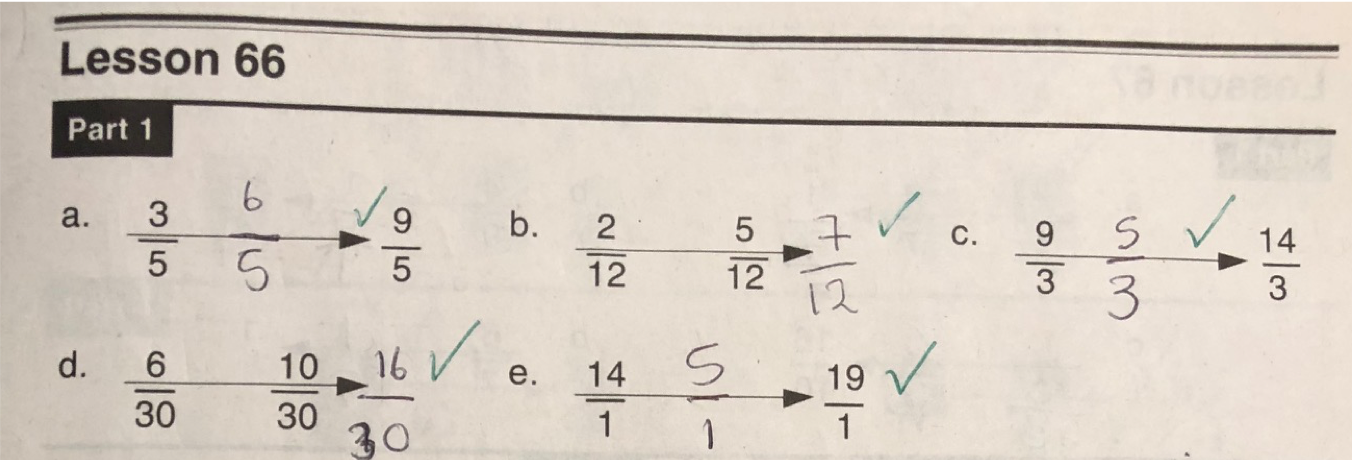
Pupils aren’t evaluating the calculation. They are rewriting the calculation so their answers would look like this:

I have deliberately started with explicit examples meaning that the 2 decimal places decimal and two-digit integer have digits more than 0. Only from example 4, I have introduced a single figure of 5; this is because pupils must write the digit 5 as 0.05 where there is a zero between the decimal point and the 5. Starting with explicit features such as digits more than 0 in decimals and integers makes the change from one calculation to the equivalent one more clear.

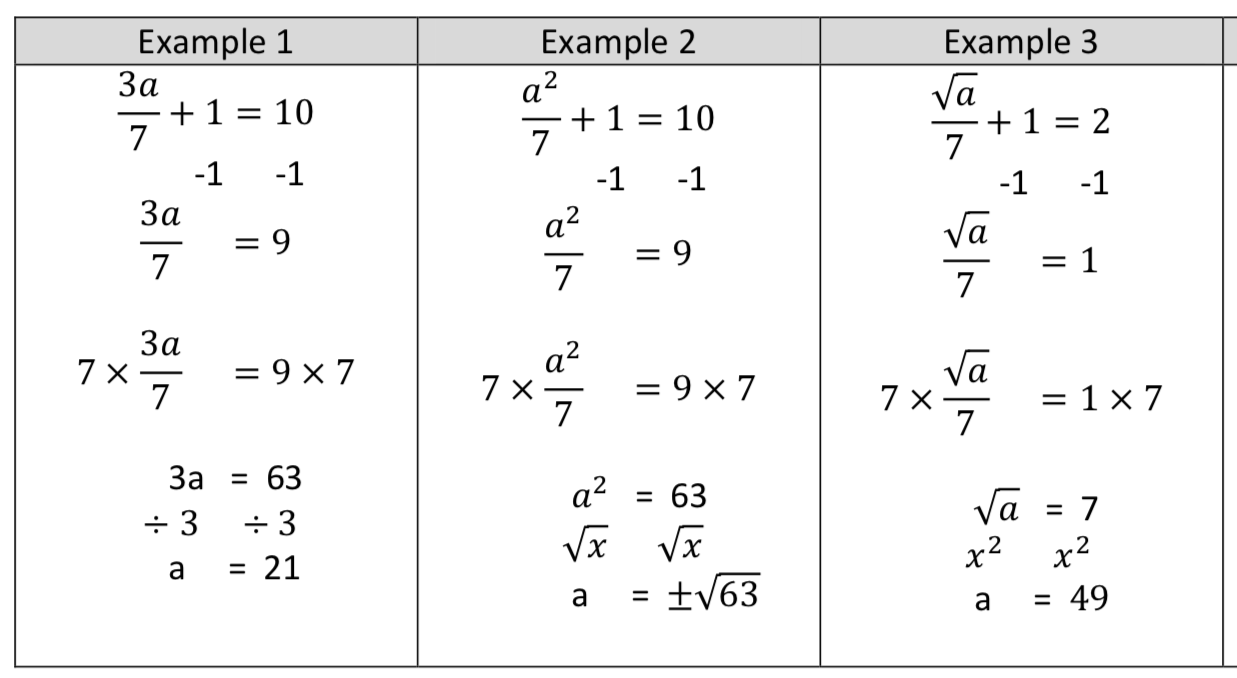
Pupils then will complete a practice exercise where they will rewrite a decimal calculation but ending in the same result as the first decimal calculation.

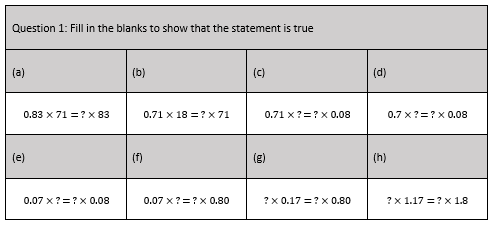
They will then transition onto a filling in the blank exercise like shown below:

4) Equating Percentages: Introduce the Example-Pupil attempt sequence

I believe that I’ve now taught all the prior knowledge pupils need to complete this statement:

40% of 70=____% of _____

The prior knowledge is listed below:

  • Writing a percentage in its equivalent decimal form
  • Rewriting a decimal multiplication calculation in a visually different form but where the result is the same as the original calculation
  • Decimal place value
  • Evaluating decimal multiplication calculations

Given that the prior knowledge has been taught and committed to long term memory, there is only one new thing pupils need to learn to complete the statement. They need to write the percentage as a decimal and replace the ‘of’ with a multiplication sign. Then every other line of working is prior knowledge that has already been covered.

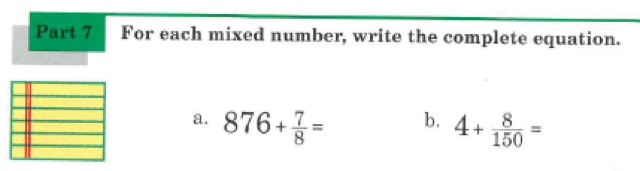
Here is the working out, and the new line of working is in bold:

40% of 70 = ____% of _____
0.40 × 70 = __.__ __×____
0.40 × 70 = 0.70 × 4

5) Comparing Percentage Increase/Decrease

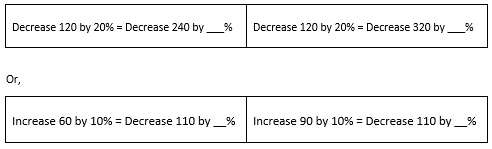
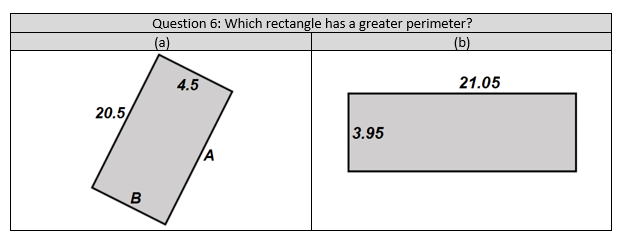
What has been learnt here can also be used to complete statements like this below, and place the correct symbol between the statements <, > or =

6) Equating Percentage Increase/Decrease

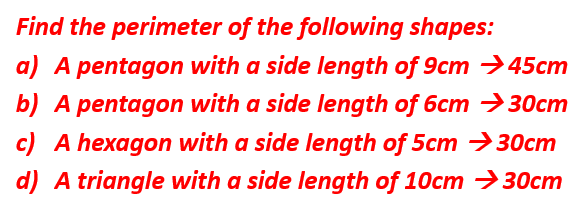
The next level of difficulty that is accessible because of the prior knowledge taught is that pupils can evaluate the complete statement and equate the result to the incomplete statement.

Here the new knowledge being taught is dividing the result by the value in the incomplete percentage calculation.

However, what makes this more complex is that you must evaluate the complete calculation and equate the result to the incomplete calculation to then find the missing percentage. So pupils must:

1) Convert the decimal into a percentage
2) If the calculation is a percentage decrease, then subtract the percentage from 100%
3) If the calculation in a percentage increase, then subtract the percentage from 100%

Summary

I appreciate all the beautiful problems and mathematical tasks that Andrew provides on his website. They are incredibly rich in knowledge and can create a valuable mathematical conversation between teachers and pupils. There is a great deal of importance in teaching inquiry tasks because it is an opportunity to develop a flexible understanding of the subject. However, where I would disagree with the Inquiry Maths model would be how the mathematical task would be used and how the content would be taught to children. I think there is a great deal of prior knowledge that needs to be sequenced, so all future learning is supported by prior learning, and that only one new thing is being taught at each part of the sequence. This is to avoid cognitive overload.

I hesitate to have pupils taking responsibility for directing the lesson because each child will focus on a different aspect of the mathematical problem in front of them. More importantly, they will focus on various aspects depending on what knowledge they already have. It is inevitable that in any learning experience, each pupil will be starting at a different point based upon how much knowledge they have. However, when pupils direct the lesson that will result in more knowledgeable peers leading the lesson, and weaker pupils struggling to identify or learn aspects of mathematics that they need even to attempt the mathematical problem. By laying out the prior knowledge and sequencing it, you are allowing the more knowledgeable pupils to consolidate any existing knowledge they may already have, but you are letting the weaker pupils close any gaps they may have. Overlearning is an essential part of the learning process; it helps the more knowledgeable pupils to learn something to the point that they never make a mistake.

This attempt, I believe allows all pupils regardless of their knowledge gaps to have any missing gaps filled, but also allows all pupils to be able to access the mathematical problem.

#Mathsconf18: Atomisation Pt 2


 #Mathsconf18: Atomisation Pt 2

Atomisation: Breaking down your teaching as you have never seen before…

On Saturday 9th March I delivered a workshop at the La Salle Mathematics Conference in Bristol. This blog post is a summary of some of the points made in the session.

For this workshop, I chose to look at an uncontroversial topic such as Angles on parallel lines. I think it’s uncontroversial because teachers know that it is an undeniable part of geometry that is commonly assessed. Also, I think it’s a topic which is taught with a poor sequence of examples. Lots of angle problems on parallel lines feels like an angle chase – when you find one angle then how can you find the other angle. However, in the process, pupils can’t have the rich mathematical discussion between the relationships of different angle facts on parallel lines. Part of teaching this topic effectively is dependent on the sequence in which the examples are organised.

When I started making the worked examples for this topic, I thought about the simplest application of angles on parallel lines for each angle fact and the most complex application. What I realised is that I could have spent hours or even days making lots of different worked examples. To avoid this, I thought of how I could cover all the myriad of complexities for each angle fact within the fewest number of worked examples.

The first step was to write out all the sub-tasks that I planned to teach:

–   Vertically Opposite Angles are Equal

–   Alternate Angles are Equal

–   Co-interior Angles sum to 180o

–   Corresponding Angles are Equal

–   Basic Angle facts on parallel lines

–   Angles on parallel lines – Algebraic

o   Simplified expressions equal to 180o or 360o

o   Simplified expressions equal to form an equation with unknowns on both sides.

After I listed the sub-tasks, I realised that I wanted to try a different pedagogical approach from the status quo approach. Historically, pupils are told that one unknown and one known are equal, and they are to accept it, and then identify the unknown and known angle pair which are equal in a similar looking example. Instead, I showed a selection of worked examples where the angles were of equal size, and I would state that these two angles are equal. I used Geogebra which is an online graphing programme where I would have an interactive set up so if I moved one of the parallel lines or the traversing line, the equal-sized angles would change from what they were before, but they would still be equal.

So, using a sequence of worked examples, I would

1)   Show the relationship with the position of angles and the angle fact

2)   Find the missing angle

3)   Find the missing angle by using a basic angle fact

NOTE: Diagrams aren’t drawn to scale here.

Vertically Opposite Angles are equal

Here is an example sequence for Vertically Opposite angles being equal

Show the Relationship

At this point, I transitioned to asking pupils in a whole class discussion the size of the unknown angles because they had seen the relationship between the position of two vertically opposite angles.

I deliberately used more challenging examples for pupils to identify one missing angle which is vertically opposite to one known angle. This is because I knew it is these type of angle problems, they would struggle with the most so I went through it with them so they would be successful when they would attempt similar issues independently. I felt that showing the relationship was explicit enough for pupils to attempt the simplest applications of identifying vertically opposite angles being equal.

The third section is using basic angle facts from the list below:

  1. Angles in a triangle sum to 180o
  2. Angles in a quadrilateral sum to 360o
  3. Angles on a straight-line sum to 180o
  4. Angles around a point sum to 360o

To either use the angle fact to determine one of the two vertically opposite angles or find one of the vertically opposite angles to then find another angle using one of the basic angle facts.

Here are some worked examples of this with an explanation:

I made Example 4 deliberately to highlight that the small triangle FCB and the large triangle KCE have the same angles.

In Example 5 and 6 I have included 2 parallel lines and 1 parallel line segment to allow Example 5 to include an opportunity to use the ‘Angles around a point sum to 360o’ fact. Similarly, in Example 6 I deliberately didn’t label the vertically opposite angle because I want pupils to start finding angles that aren’t labelled but are required to find another unknown angle.

In summary, I followed the sequence structure of:

  1. Show the relationship
  2. Find the missing angle using the angle fact given
  3. Find the missing angle fact using basic angle facts to then determine angles using the new angle facts learnt.

Alternate Angles are equal

Here is a worked example sequence showing the relationship in positioning of Alternate Angles being equal

Now using the same geometric structure as the worked examples used to show the relationship of alternate angles, I’m asking pupils to find the size of the missing angle:

Here is a sequence of worked examples where basic angle facts have been interleaved:

Co – Interior Angles sum to 180o

Here is a worked example sequence for Co-interior angles summing to 180o

In Example 7 and 8, pupils can see that each triangle formed by both traversing lines and one of the parallel lines all have the same size angles.

Here are examples where pupils are asked to use the fact that co-interior angles sum to 180o to find the missing angle:


In the last two examples we can explore so many interesting mathematical patterns between co-interior angles and parallel lines. In Example 6, A = I and G = C

Here is the next section of worked examples where basic angle facts are being interleaved:

Corresponding Angles are Equal

Here is a worked example sequence for Corresponding angles being equal

Here is a worked example sequence where pupils are using the angle fact that corresponding angles are equal to find the missing angle:


Here is a worked examples sequence where basic angle facts are being interleaved with the angle fact that corresponding angles are equal:


#Mathsconf18: Atomisation Pt 1

Atomisation: Breaking down your teaching as you have never seen before…

On Saturday 9th March I delivered a workshop at the La Salle Mathematics Conference in Bristol. This blog post is a summary of some of the points made in the session.

This presentation was on the topic of atomisation. Recently, atomisation has created a lot of conversation on Twitter and at a couple of conferences. What is atomisation and is it the next fad?

It’s not the next fad.

Atomisation is the process of breaking down a topic into its sub-tasks.

Atomisation is a term coined by Bruno Reddy who taught me about it during my second school placement in 2014.

Atomisation is the starting point to every booklet I create in my role as Curriculum Advisor at United Learning. I sit down and list all the sub-tasks that I need to teach that is within the topic. An example of this for Perimeter is available here.

What are the benefits of Atomisation in respect to the big picture?

Atomisation is a process in which teachers can collaboratively identify the specific and detailed knowledge that pupils must know to be academically successful.

Identifying this specific knowledge means that pupils can learn as close to 100% of the domain of knowledge that they need to know. Exam boards and the national curriculum, truthfully, may provide high-level specificity of what needs to be taught, but not the finer details or detailed knowledge that goes into making pupils able to do a task.

For example, pupils are expected to know the following fact below:

Fraction x Fraction’s Reciprocal = 1

And upon reflection, this seems understandable in respect to multiplying fractions, index notation, ratio, proportion etc. but it is not necessarily explicitly stated in exam board specifications or Curricula.

The lack of detailed knowledge outlined by exam boards or textbooks results in teachers reducing the subject content being taught. And the source of information of what needs to be taught from children usually comes from exam tasks, and then the curriculum becomes an endless repetition of exam materials. Similar thoughts have been shared on Daisy Christodoulou’s blog.

Mathematics as a subject is vast. There is so much to teach a child in the space of their academic career. Here is a visual:

If the bubble represents 100% of the domain of knowledge that needs to be taught. It is the case that we teach small samples of that domain. We teach concepts and how they overlap with other concepts, and we also teach connections between different concepts. However, if we use exam boards and textbooks as our source of information of what needs to be taught in the curriculum, then we inevitably miss out teaching other parts of the domain.

The process of atomisation enables teachers to focus on the concept and identify the finer details that aren’t readily available. Atomisation allows the teacher to teach as close to 100% of the domain of knowledge.

What are the benefits of Atomisation in respect to the teaching process?

Identifying and sequencing all the sub-tasks and specific knowledge that needs to be taught for a concept increases the probability each child will be successful in the learning process.

This means that pupils will be able to appropriately and accurately respond to planned questions, or that they will remember what has been taught at that moment after a long period.

Teaching aspects of a concept that are usually overlooked undermine how successful each pupil will be in respect to their future learning.

For example, not teaching pupils that:

Fraction x Fraction’s reciprocal = 1

undermines a child’s ability to attempt questions like this:

Show that the ratio in the form 1:n can be written as 1: 1.5

If pupils get these questions wrong, then the incorrect inference is made. Instead, they must be retaught the topics of ratios from the beginning, but they only need to be taught this fact. And this is a fact has been mentioned several times in the Year 8 Curriculum so far. I’ve resourced a section on problem types like this for the most recent ratio booklet coming out.

Teaching all the sub-tasks of a concept and sequencing it in a logical sequence prevents pupils from being cognitively overloaded because each sub-task taught is being used or covered in future learning. In the teaching process, pupils will have committed prior knowledge in their long term memory so any future learning will occupy space in their limited working memory.

What are the costs of Atomisation?

The cost of atomisation is a valid one. The initial stages of teaching a concept take more time to cover the content. If we explicitly teach more sub-tasks than we would normally then we would have more time available to teach the rest of the curriculum. However, by not explicitly teaching all the sub-tasks of a concept it will result in the following consequences:

  1. Reduce the probability of a child learning parts of a concept on the first attempt
  2. Undermine a child’s ability to access future learning

Atomisation avoids these inadvertent consequences by:

  1. Guaranteeing a greater likelihood a pupil will learn the sub-task on the first attempt
  2. Increasing the probability of success when learning future content or more complex applications of the concept
  3. Saving time in the future which would be inevitably spent re-teaching
  4. Revealing sub-tasks that need to be taught that are usually overlooked in the curriculum.

In summary, Atomisation has improved my teaching and as a result my pupils learning more and remembering it a half term later, a year later etc. More importantly, it benefits the children that struggle with learning the most. Atomisation has allowed my weakest pupils learn more in less time, and in my small world, I believe that this is a path that I will continue down when creating resources.


Reflections of 2018 Pt1: Great Yarmouth Charter Academy: Pinnacle of Teaching

2018 has been the best year of my career by far. Not necessarily the easiest, but it’s been the year where I have learnt the most about developing my teaching practice. I feel closer than ever to achieving what I call the Pinnacle of Teaching.

The pinnacle? That’s what I call teaching where the highest possible proportion of pupils learn what is being taught on the first attempt. It’s hard, but possible, and I think I got close to it whilst working at Great Yarmouth Charter Academy (Charter).

Charter was the best school that I’ve worked at. It’s the best, I think, because staff are encouraged to work with what Ray Dalio, in his book Principles, called ‘Radical Transparency’. Dalio defines it as “a culture that is direct and honest in communication and sharing of company strategies so that all people are trusting and loyal to the continuous evolution of the organization. For leaders, radical transparency is a way to build trust with their employees.”

At Charter, if I made a mistake I felt I could report it without fear of rebuke or reprisal. A moment of magic or a mistake, the reaction from staff was always supportive, professional and  converted into a learning point. Charter is a school where teachers can openly talk about a mistake they have made in a lesson, or how they could have taught that lesson better upon reflection, or how a lesson went better than expected. This is because the Headmaster, Barry Smith, is unapologetically transparent. Barry is transparent with his teachers, support staff, pupils, parents, the media, you name it. He supports his staff, nurtures them and empowers them. I’ve regularly spoken to Barry or a member of SLT about something that went wrong in a lesson, and how I learnt so much from it, and how I would do things differently. This practice was encouraged, and Barry would regularly share such anecdotes with staff during briefings. You would see the member of staff being mentioned beam with joy for being recognised for their honesty.

The transparent environment gave me the space to challenge orthodoxies and previous pedagogical insights and try other teaching strategies which could (and did) result is greater returns. The return was inching ever closer to the Pinnacle of Teaching. How did I come close to achieving this? The determining factor was pre-emptive planning.

Pre-emptive planning

In my planning, I would prepare worked examples, a parallel set of AfL questions and then create practice exercises for pupils to complete independently. I would try to cover all the possible problem types for a concept, so there would be a teaching sequence where all the pupils would quickly transition from the simple types to the most complex. Importantly, I would allow more time for the harder examples because all pupils need to be given the time and space to tackle a concept in its most complex form.

This pre-emptive planning saved me minutes in every lesson, which ultimately saved hours over the course of the term. I wouldn’t be re-teaching, I was happier, and the kids felt more successful.

From my resources I was able to see and explain

  1. What the children were doing
  2. why the kids were learning what they were learning;
  3. what the children gained from this learning experience
  4. how I knew the children were learning
  5. how the children knew they were learning

With planned resources, I could then focus on my teaching. Once pupils had learnt the material, I focused on helping them to retain what they were learning. This is so important. I tested pupils’ understanding by writing 5 – 7 recap questions on a post-it note, and kids would do these questions on their mini whiteboards at the start of the lesson. These were the hard questions that I knew pupils needed daily practice to prevent forgetting. I would then ask them to complete AfL questions on their mini whiteboards along with a fortnightly quiz to cover the full domain of what they had learnt.

The testing process was about 75% of the teaching process. This doesn’t mean the actual teacher instruction isn’t important. It just means the testing has to be more important. The testing process is the pupils chance to apply what they have understood from the teacher instruction. The learning for pupils starts once they are tested.

I think it’s commonly mistaken that pupils listening to the teacher going through worked examples is the learning process completed. Listening isn’t necessarily evidence that the kids have learnt anything, but pupils listening to the teacher gives the impression they are learning.

In March, I was feeling more successful as a teacher, and my pupils were getting accustomed to the feeling of success. They were learning content faster, and retaining it for longer.

Here are some videos of pupil work (Year 8 set 3/3):

20180614_125147000_iOS

IMG_1533

To add a bit of context, I worked in a school that was struggling. Once Barry arrived behaviour rules were enforced consistently, which put the authority back into the hands of the teachers but the pupils that I taught had a shaky foundation of knowledge that I had to re-sequence the scheme of work to teach them the fundamentals: four operations (with Year 7 and bottom sets), negative arithmetic, number theory etc. Only after the first half term of sorting out the basics was I able to make the scheme of work accessible for them. This was a difficult call, but I could do this because I could be honest and say – “the kids haven’t really learnt much from the previous years, if they have, then don’t remember any of it.”

I got to a point where a large proportion of children in each class would complete the AfL questions correctly on the first attempt. Yes, there were some children who struggled to get questions right the first time. However, over time those pupils eventually would get the answer correct on the first question attempt, more frequently. These are the pupils that I think about the most when I am creating resources. How do I make this pupil successful when completing a sequence of questions?

The radically transparent environment enabled me to do my job to the best of my ability. Kids could learn better and were better able to retain their learning. Because this was going on in every classroom the school’s results achieving at least a 4, leapt from 30% to 58% in just one year.

It’s a magical place. Go and visit, Barry and his team would love to have you. The word on Twitter, is that he is looking to recruit Maths Teachers and a new Head of Maths. Get in touch if you are interested.

Read more about the school in these blog posts:

https://thequirkyteacher.wordpress.com/2018/07/13/qt-goes-to-gyca/

https://readingallthebooks.com/tag/great-yarmouth-charter-academy/

https://tothereal.wordpress.com/2018/03/10/an-angry-blog-post-about-great-yarmouth-charter-academy/

http://becausememories.com/2018/10/21/gy-charter-hearts-and-mindset/

#mathsconf16/17: Atomising

This blog post is a summary of a workshop I ran at Mathsconf16 and 17. The session was called “The Pareto Principle of Lesson Planning” and the rationale was to explore how the Pareto Principle explains that the general relationship between inputs and outputs is not balanced. It can be the case that a small number of inputs can lead to increased outputs I explore this in more detail and use the context of teaching perimeter.

What is the 20% of the input that contributes to 80% of the result?

The 20% input is referred to as Atomising. This is the process where you break down a topic into its sub-tasks. This is a term coined by Bruno Reddy.

The 80% result this achieves is that it allows pupils to develop flexible knowledge of the concept.

Atomising avoids two common pitfalls.  Firstly, it avoids re-teaching. I’ve certainly been in a position where I have taught a unit of work and then realised certain sub-tasks that I could have taught which would have helped my pupils develop a better understanding of the concept. Secondly, you avoid missing out sub-tasks to teach. When you breakdown a topic into its sub-task you avoid missing out certain aspects of a topic which really need to be taught explicitly. Due to the so-called ‘curse of knowledge’, teachers often forget that there are certain decisions and procedural knowledge that we have but which we forget to teach to the kids. Either it is so obvious that we think the kids already know it or, more commonly, we don’t realise which areas of the topic we are teaching pose difficulties for the kids. It could be that the difficulty is caused by a weakness the pupil may have in a different area of maths. For example, if a child is finding the missing side length of a shape, and the perimeter is a whole number, and the sides add up to a decimal, then the area of difficulty may be that a pupil doesn’t know (or remember) how to subtract a decimal from a whole number.

Here are the 12 sub-tasks that I used to break down the topic of perimeter. I chose perimeter deliberately because I think it is a perfect example of a topic which is perceived to be very easy for pupils to learn. However, there are certain aspects of perimeter that I will identify which I don’t think are explicitly taught. I think this because I have seen this to be the case when looking through several secondary maths textbooks.

Atomising

Perimeter:

1)      Perimeter of Irregular shapes

2)      Perimeter of rectangles

3)      Perimeter of parallelograms

4)      Perimeter of regular polygons

5)      Manipulating the perimeter of regular polygons

6)      Manipulating the perimeter of a rectangle – one side length given

  1. Given the perimeter, what is the perpendicular length
  2. Writing the possible side lengths of a rectangle given the perimeter

7)      Manipulating the perimeter of an Isosceles triangle and an Isosceles trapezium

  1. Given the perimeter, what is the size of each equal side length

8)      Perimeter of a compound shape

  1. What is a compound shape?
  2. Perimeter of a L-shape compound shape (irregular hexagon)
  3. Perimeter of non-L-shape compound shape

9)      Manipulating the perimeter of a Compound shape

  1. Finding one missing length of a compound shape – not using the perimeter
  2. Finding one missing length of a compound shape – using the perimeter
  3. Finding two missing lengths (not connected) of a compound shape – using perimeter
  4. Finding two missing length (connected) of a compound shape – using perimeter

10)   Perimeter of Compound shape – combining polygons

  1. Combining regular polygons to form a compound shape – using the perimeter of the original polygons
  2. Combining irregular polygons to form a compound shape – using the perimeter of original polygons

11)   Perimeter: Increased, decreased or stayed the same

12)   Drawing shapes on a square grid

The thinking time that went into breaking down the topic of perimeter took me 10 minutes. I think if I hadn’t gone through this process then I would have certainly missed many sub-tasks. In addition, it would have resulted in me having to do a lot of re-teaching.

Please note that some images aren’t drawn to scale, unless stated.

Example Sets for Each Sub-Task

1)      Perimeter of Irregular shapes

I started to teach perimeter using explicit examples where pupils had to deliberately add all the lengths. They had questions where the side lengths were labelled using integers, decimals (same number as well different number of decimal places), multiples of 10, etc.

2)      Perimeter of rectangles

I started teaching this with all side lengths labelled, then only three sides labelled, then only one pair of perpendicular lengths labelled. Then I included questions where pupils had to deliberately compare the perimeter of two shapes. The questions were designed so it wasn’t visually obvious which shape had the larger perimeter. Here is an example:

An example like the one above forces pupils to add the values because, even though the longest length has increased in size, the smaller length has decreased in size. This question is also designed so the shapes have the same perimeter.

3)      Perimeter of Parallelograms

This sequence was very similar to the sequence for finding the perimeter of a rectangle:

  • All side lengths labelled
  • Three side lengths labelled
  • One long and short length pair labelled, etc

4)      Perimeter of Regular polygons

Here pupils are being taught to calculate the perimeter of a regular polygon using multiplication. They are taught that if you multiply one side length by the number of sides then you can calculate the perimeter.

The sequence of questions shown above demonstrates that we can get the same perimeter despite the polygon changing and its side length changing. I have also deliberately designed the questions to communicate this flexible understanding of perimeter. From the first question to the second, the side length changed. When you move to the third question then the shape and side length change, but the answer doesn’t change. For the fourth question, the side length and shape have changed but the answer doesn’t change.

5)      Manipulating the perimeter of a regular polygon

Here pupils are given the perimeter of a regular polygon, and they know the number of sides each regular polygon has, so they need to find the side length of that regular polygon.

Here is an example set of questions:

Here the perimeter of the shape has stayed the same, but the shape has changed. Here pupils can see that when the number of sides increases, then the side length decreases, given that the perimeter hasn’t changed. They can also see examples where the side length can be a fraction.

I haven’t asked pupils to convert the improper fraction into a mixed number because a mixed number communicates size in a way that an improper fraction doesn’t. A mixed number would communicate more to a pupil about the side length of a square in relation to the side length of the pentagon in the previous question. However, the focus is not in understanding the magnitude of the square and heptagon. The focus here is to get pupils to state the perimeter of a regular shape given the perimeter of that shape. Pupils are practising the procedure of dividing the perimeter by the number of sides of the regular polygon, to find the side length.

Pupils are then asked questions where they are given the perimeter and they must state which regular shape would have the greatest side length. This helps pupils to see that a regular polygon with more sides will have a smaller side length compared to a regular polygon with fewer side lengths, given they have the same perimeter.

For example:

And here is an example where they aren’t given the perimeter at all:

Within this aspect of perimeter, I also created questions where pupils had to find the perimeter of a regular shape knowing that the value of the side length is equal to the number of sides that polygon has. Here pupils are using their square number knowledge to find the perimeter of a regular polygon.

6)      Manipulating the perimeter of a rectangle – one side length given

Here pupils are given one side length of a rectangle and the perimeter of that rectangle. They now need to find the other perpendicular side length. Here they are practising the procedures of:

1)      Double the side length given

2)      Subtract from the perimeter

3)      Divide that by two to find one of the missing side lengths

Here are some examples:

I deliberately put in an example where pupils were doubling an even number for the first example and an odd number for the second example. I deliberately gave pupils the longest length in the first example and the short length in the second example. This is because I want them to see that I have changed the side length but the procedure to find the other length hasn’t changed.

The third example uses a decimal because, when you double it, you get an odd number. When you subtract from the perimeter, you get an odd number, so when you halve the odd number you then get a decimal. I made the question arithmetically more difficult because I knew that in the first two examples the answer would be an even number which is divisible by two. I wanted to make a question where pupils could see that you can get a rectangle with a side length which is a decimal, and not a whole number.

I then moved on to asking pupils to state the different possible rectangles they could make for a specific perimeter. There are many possibilities. I restricted the possibilities by putting in a few conditions. Here is an example:

Here pupils can only give these answers, because the first value is A, and it must be larger than B’s value. In addition to this, I designed the question so pupils had to stop at 7 + 5 to avoid writing 6 + 6 because then the value of A and B would be the same. This is not what the question is asking.

7)      Manipulating the perimeter of an Isosceles triangle and an Isosceles trapezium

Here pupils will practise finding the missing side length of an Isosceles triangle where they are practising the procedure:

1)      Perimeter – base length

2)      Divide by 2 to find the value of each equal side length

The images aren’t drawn to scale. Here are some examples:

Here I deliberately used 8 and 12 in the first two examples to get kids to actively use the procedure to avoid being in autopilot mode. The numbers are similar for this reason. Pupils can then see that as the base length increases between the first and second question, the side length becomes smaller. In the final example I use an odd number for the base number, to deliberately get each equal side length to be a decimal.

Pupils then apply a similar procedure to find the missing side lengths of an isosceles trapezium, but there is an additional step:

1)      Add the known side lengths

2)      Perimeter – total of side lengths

3)      Divide by 2 to find the value of each equal side length.

The images aren’t drawn to scale. Here are some examples:

Pupils here also see that, when the top parallel length increases from the first example to the second example, each equal side length decreases. Similarly, from the second to the third example, when one of the parallel lengths go from 5cm to 4.5cm, each equal side length increases.

8)      Perimeter of a compound shape

Pupils will learn what a compound shape is. They will then find the perimeter of a compound shape. I will use the L-shape compound shape because pupils will eventually learn that if you add the longest horizontal length and the longest vertical length, then double it, you will also find the perimeter of the shape.

Pupils will see questions where they are working with integers, decimals, both etc.

The images aren’t drawn to scale. Here are some examples:

They will then learn to find the perimeter of different types of compound shape. The images aren’t drawn to scale. Here are some examples:

9)      Manipulating the perimeter of a compound shape

Here pupils will first be asked to find the missing length. They won’t be using the perimeter at all. This is because I want pupils to understand which lengths are related to each other, and which aren’t. In the second image, the vertical lengths are related because the longest length subtract the shorter length will find the value of A. These lengths are connected to each other.

Similarly, in the second image, the horizontal lengths are related because the two shorter horizontal lengths sum to give the size of the longest horizontal length. These lengths are related.

So, pupils will first practise finding the missing lengths without using the perimeter at all.

They will then be asked to find the perimeter of the shape once they have found the missing values for A and B.

The images aren’t drawn to scale. Here are some examples:

Here is another example which is rotated to get pupils to still identify the connected side lengths:

And another, finding a missing length for different compound shapes:

I then increase the difficulty in finding the missing length of a coumpound shape. Here we can’t find the missing lengths unless we have the perimeter. This is because the third image has two conneted vertical lengths which are missing.

The images aren’t drawn to scale. Here are some examples:

If the perimeter of the compound shape is 36cm, now I can find both missing lengths.

The images aren’t drawn to scale. Here are some examples:

Questions like these allow pupils to understand the following:

1)      If two connected lengths are missing, then I can only find these lengths if I have the perimeter

2)      Given the perimeter, I must follow this procedure.

I like these questions a lot because I have made the concept more difficult by not combining other perimeter with other concepts, or by making the numbers more difficult. I have taken the concept of perimeter with compound shapes and changed the amount of information given. The difficulty is within the concept.

10)   Perimeter of Compound shape – combining polygons

  1. Combining regular polygons to form a compound shape – using the perimeter of the original polygons

Here pupils are learning to combine different shapes to form a compound shape. Here they see a compound shape being formed and trying to understand what lengths are required and which aren’t required. The images aren’t drawn to scale. Here are some examples:

  1. Combining irregular polygons to form a compound shape – using the perimeter of original polygons

Here we have moved from combining regular shapes to irregular shapes. I must structure the question in a way that one length of the first shape is equal to one length of the second shape. This gets pupil again recognising which side lengths of the two original shapes are required, and which aren’t, to find the perimeter of the new compound shape. The images aren’t drawn to scale. Here are some examples:

11)   Perimeter: Increased, decreased or stayed the same

Pupils are moving onto identifying that the perimeter is something that can change by increasing, decreasing or changing shape, but the perimeter can remain the same.

Here they aren’t being asked to find the perimeter of a shape, but instead they are to say whether the shape has a perimeter which is greater than, smaller than, or equal to the perimeter of the original image. The images aren’t drawn to scale. Here are some examples:

This also allows pupils to see that we can change the image and that the perimeter can change, but it also may not change.

12)   Drawing shapes on a square grid

Pupils are now at a point where they are taking their knowledge of drawing rectangles with a specific perimeter which has been taught in this sequence, but now drawing it on a square grid.

The images aren’t drawn to scale. Here are some examples:

Pupils are then equipped to match a specific perimeter to a specific image. They are applying what they have learnt rather than answering direct questions.


Charter Diaries: Mr Gabr’s Strong Start to the lesson

My first impression of Mr Gabr’s start to the lesson can be summarised into three words: purposeful, warm and knowledge-rich.


Image: Mr Gabr teaching. This is from a different lesson. Not the lesson mentioned in the blog.

Mr Gabr’s million dollar smile greets children whilst he stands at the threshold of the Classroom.  This is a Teach Like a Champion (TLACI) technique referred to as ‘Threshold’. One foot in the corridor to keep track of children walking towards the teacher. One foot in the classroom to ensure that pupils know that when they enter the room they are to be silent and start the work prepared on the whiteboard. Mr Gabr’s eyes are everywhere!

The first child enters the classroom, mirroring Mr Gabr’s smile. The pupil walks to his desk and starts thinking about the questions displayed on the board. This pupil silently recites the two definitions written on the board. Another two pupils enter and do the same. Every second counts and Mr Gabr is quick to start firing questions to individual pupils whilst they are organising their books and getting their equipment out, straight into a SLANT position, tracking Mr Gabr.

Mr Gabr asks one pupil a question which he answers incorrectly. Mr Gabr poses the same question to another pupil. The second pupil asked says the right answer, Mr Gabr then asks the first pupil to repeat the answer. The first pupil starts smiling, Mr Gabr reads his mind “See you did know the answer, you just spaced for a minute, happens to me too.” This is a lovely and slick demonstration of TLAC’s teaching technique referred to as “No opt out.”

All pupils have now entered the room, at their desk, book and equipment out, Mr Gabr tells all pupils to take a seat. He informs pupils to get writing into their books to answer the questions on the whiteboard. Great demonstration of TLAC’s ‘Do Now’, a speedy review for 5 minutes. Pupils are in a solid routine and start the work without any direction from Mr Gabr. To help pupils Mr Gabr reads out the question, asks for whole class choral response after 3 for the answer to the question.


Mr Gabr: “What is the definition of a prokaryotic cell? 3 – 2 – 1″

Whole class: “A cell with no membrane-bound organelles.”

Mr Gabr: “Give me an example of what I mean by ‘no membrane-bound organelles’? 3 – 2 – 1″

Whole class: “No nuclei”

Mr Gabr: “What is the definition of a eukaryotic cell? 3 – 2 – 1″

Whole class: “A cell with Membrane-bound organelles.”

Mr Gabr: “Give me an example of what I mean by ‘membrane-bound organelles’? 3 – 2 – 1″

Whole class: “Cells with nuclei”

Mr Gabr: “Now only the boys!”

Boys only: “Cells with nuclei”


Kids have finished writing. Pupils are asked to SLANT and track the teacher. Mr Gabr poses his next series of questions. A pupil responds with a mediocre answer where he used the term ‘egg’ instead of ‘ovum’. This is another learning opportunity for the kids. Mr Gabr then poses the questions “What is the scientific word for ‘egg’?”

There is a forest of hands up in the air. At Charter, we push to have as many pupils to have their hands up in the air to answer questions. The pupil who gave the mediocre response is asked to repeat his answer using the word ‘ovum’ rather than the word ‘egg’.

It’s been 10 minutes of teaching where every second has really mattered. He introduces what will be taught today and dives straight into looking at respiration’s chemical equation. He is very deliberate with wording, and he pre-empts possible misconceptions that pupils may have in advance. For example, he states that in a chemical equation we use an arrow to separate the reactants from the products, not an equal sign. Pre-empting that ‘equation’ is a term used in maths which refers to an equal sign or identity sign being present. He pre-empts that reactants of a chemical equation are on the left hand side of the arrow, and that products are on the right hand side of the arrow. He talks about how when we write carbon dioxide as one of the products in the chemical equation, we write dioxide right below carbon, we don’t go to the left of the margin to start a new line, as it may look like you wrote dioxide to be a reactant.

Image: Recreation of Mr Gabr’s board work

He explains that we write energy as a product but the term ‘+ energy’ must be in brackets, because energy is not matter. Chemical reactions do involve energy. He emphasised the importance of this and showed pupils how to write the equation with energy as a product, and the incorrect way of writing the equation with energy as a product.

I’ve only witnessed the first fifteen minutes of Mr Gabr’s lesson, but here is a summary of what I’ve witnessed to be great classroom practice from an experienced teacher:

  1. Warm welcome to the classroom
  2. Use of TLAC teaching techniques: “Threshold” “I say, you say” “No opt out” “Slant” “Do Now”
  3. Whole class choral response: all pupils are expected to participate, if they don’t know the answer then they are able to learn it from others around them
  4. Purposeful start to the lesson: task is prepared
  5. Improving pupil answers from mediocre answers to top quality answers
  6. Pre-empting misconceptions
  7. Precise and Concise teacher instruction

At Great Yarmouth Charter Academy, we have an open door policy where teachers are welcomed to observe and learn from their colleagues. This invitation to visit extends to local members of the community, parents, teachers and Headteachers far and wide. We have had several visitors come and experience a day with us. This is also an invitation welcoming you to visit our school. Please feel free to get in touch with the school office to arrange a tour. 

If you wish to know more about our school feel free to check out the blogs and tweets of our staff:

Head Teacher: Mr Barry Smith (@BarryNSmith79)

Assistant Principal: Dr Anthony Radice (@AnthonyRadice1)

Assistant Principal: Mr Darren Hollingsworth (@DarrenHolly3J)

Engelmann Insights: Structuring Teaching for the Weakest Pupils (Part 4)

This blog post is the last of four posts outlining the teaching and sequencing of various fractions skills taught in the Connecting Maths Concept Textbook series. Specifically, Level D. The first blog post can be found here. The second post can be found here.  The third post can be found here. The following content was shown at La Salle’s National Mathematics Conference in Kettering.

16. Deciding whether to multiply by more than one or less than one

This is one of my favourite component skills taught in the Level D textbook series. In this exercise pupils needed to identify whether what we multiply the first integer by is more than 1, less than 1 or equal to 1 depending on the result of the calculation.

If you multiply by more than one you end up with more than you start out with.

If you multiply by less than one you end up with less than what you start out with.

Pupils did find this difficult to learn. I did breakdown the questioning further in addition to what was stated in the teacher presentation book.

1.Which number is bigger?

2.What number is smaller?

3.Am I going from a big number to a small number? Yes or No?

4.Am I going from a small number to a big number? Yes or No?

5.If I am going from a big number to a small number, then I am multiplying by less than 1.

6.If I am going from a small number to a big number, then I am multiplying by more than 1.

Pupils were also taught that if the value in the calculation is equivalent to the value in the answer then I have multiplied by 1. This was understood because of learning about equivalent fractions where you multiply by a fraction which can simplify to one.

The reason why I really enjoyed teaching this was due to the rigour of the exercises. The design of the exercise below is pure genius. It gets kids to think whether a fraction less than 1 is smaller than an integer, or which fraction is smaller out two fractions with the same denominator.

In regards to question (d), pupils are able to write seven-sevenths as an integer equal to 1. They are seeing that they are going from a small value to a big value so we are multiplying by more than

For question (e), pupils write the fraction of twenty-seven-ninths as an integer before they determine whether they multiply by more than 1, equal to 1, or less than one.

17. Multiple Representations

Pupils are identifying the relationship between multiplication and division by showing division calculations as a reverse multiplication calculation, a fraction and the bus stop method.

There are exercises which pupils are given a calculation in one form and they need to write it into the other format. I really value exercises like this because when pupils complete mathematics problems in their GCSE or A Level exam papers that they can write their answer as a fraction, or divide the top and bottom to write it as a decimal etc. I just recently marked my Year 11 mock papers and it was lovely to see that so many pupils were able to see that when solving to find a value that they saw it as a fraction, that they would then use the bus stop method to write the fraction’s value as an integer or decimal. This wasn’t the case in their paper workings from their first round of mocks in November.


18. Demonstrating equivalence

Pupils are now showing equivalence without images. Here they are given two fractions, and they need to determine what the first’s fraction top number is multiplied to get the second fraction’s top number. This is also done for the denominator. If they multiply the top and bottom by the same number then the fractions are equal, and they place an equal sign between the two. If the fractions are not multiplied by the same number then the fractions are not equal, and they place an not-equal sign between the two.

19. Number Family

A number family is a tool that pupils use to solve hard addition and subtraction problems. This has been blogged about here in a three-part series.

A number family is a sum between two small numbers presented above an arrow which has a large number at the end of the arrow. Pupils are taught that if you have a two small numbers then you add them to get the missing big numbers. Pupils are also taught that if you one big number and one small number then you subtract to get the missing small number.

Pupils are now taught how to apply this in problems where they need to demonstrate that the fraction of shaded parts and non shaded parts sum to 1.

On the number family, the fraction of shaded parts and the fraction of non shaded parts are the small numbers. They sum to 1, and pupils know this because they know that a fraction with the same top and bottom number simplifies to 1.


Exercises ask them to present a calculation between the shaded and non shaded parts.

Eventually pupils attempt exercises where they write a number family calculation from a sentence. They know that the number family’s big number will be 1. They write one as a fraction with the same denominator as the fraction of both small numbers.

This progresses in difficulty where pupils are given information not in terms of fractions but as whole numbers, they need to find the denominator and then write the information given as a fraction, then present in a number family structure.

Here are some examples of pupil work:


20. Writing a mixed number as a decimal

The final component skill looks as getting pupils to write a decimal as a top heavy fraction and then as a sum of an integer and a proper fraction. Pupils are told that the decimal point is the plus sign between the integer and fraction. This was a very smooth transition from working with fractions to writing decimals.


What’s next…

After looking in great detail into Engelmann’s teaching, specifically with fractions, I’m now attempting to create exercises which can be used in the classroom for mainstream teaching. Watch this space!


Engelmann Insights: Structuring Teaching for the Weakest Pupils (Part 3)

This blog post is the third out of four posts outlining the teaching and sequencing of various fractions skills taught in the Connecting Maths Concept Textbook series. Specifically, Level D. The first blog post can be found here. The second post can be found here.  The following content was shown at La Salle’s National Mathematics Conference in Kettering.

10. Introducing Mixed numbers 

Mixed numbers are introduced as a sum between an integer and a (proper) fraction.

It is visually presented on a number line, you go to the marker for the whole number. Then you count parts for the fraction.

The skill is revisited where pupils write the addition sum between an integer and a fraction as a mixed number, without the number line. Pupils are then asked to do this again with three or four digit numbers.


Pupils also complete exercises where they:

  1. write an improper fraction as a sum between an integer and a proper fraction
  2. show the sum of an integer and fraction as a sum of two fractions


11. Multiplicative relationship between an integer and a fraction’s denominator 

Pupils have been taught previously how to list a string of equivalent fractions equal to an integer, listed as skill 8. This was done through the use of their times table facts. Similarly, pupils are now taught how to find the missing numerator of an incomplete fraction equal to an integer.

12. Equivalent fractions from a diagram

Pupils are taught that:

If fractions are equal, pictures of each fraction will have the same shaded area.

If the fractions are not equal, then the pictures do not have the same shaded area. 


A teaching point to mention, I got the pupils to use a ruler to check to see if the shaded areas matched to make them see the connection that equivalent fractions are equal in size, the equivalent fractions presented vary visually. This helped pupils to attempt multiple choice questions like the following:


This was also tested using equivalent improper fractions. In the image titled Part 9, I particularly like (c) and (e) because the parts are split horizontally and vertically. Engelmann here has varied the non-relevant aspects of each image: the number of units for each image, the shape being cut horizontally and vertically etc. What matter is the whether the area between each image is the same, if so then those fractions are equivalent. At this stage, pupils are not being asked to demonstrate equivalence using times tables between two fractions.

13. Multiplying fractions to demonstrate equivalence

Pupils are taught that if you multiply an integer by a fraction which is equal to 1, then the result is the integer in the question. Images are provided to show that you are taking two whole units, and splitting the shape into more parts in each unit.

Pupils are also learning to spot visually that when you multiply an integer by a fraction with the same numerator and denominator that it is equivalent to multiplying the integer by one.

Pupils are taught how to structure their working when multiplying fractions where they write the integer with a denominator of one, then multiplying the numerators, and multiplying the denominators.

14. Placing fractions on a number line  (work on)

This was an exercise that pupils did find difficult. Pupils had to place an improper fraction on the number line. What pupils found the most difficult was picking an integer equivalent fraction which two-fifths came after. For example:

I want to place two-fifths on the number line. I will go to the integer with a fraction which is just before two-fifths. I will go to zero-fifths, and count two parts to find two-fifths.

I want to place nineteen-fifths on the number line. I will go to the integer with a fraction which is just before nineteen-fifths. I will go to fifteen-fifths, and count four parts to find nineteen-fifths. 

I want to place thirteen-fifths on the number line, I will go to the integer with a fraction which is  just before thirteen-fifths. I will go to ten-fifths, and count three parts to find thirteen-fifths.

Exercises were included where pupils were asked to also label fractions onto a number line where the integers, or the integers’ equivalent fractions aren’t labelled.

15. Equivalent Fractions – Multiplying a fraction by 1

In this exercises pupils are demonstrating equivalence between two fractions by writing the fraction to multiply the first fraction by to get the second fraction.


Pupils were using times tables to identify what the first fraction’s numerator and denominator are multiplied by. This fraction has the same value in the top and bottom of the fraction which then simplifies to one. Equivalent fractions are multiplied by a fraction which simplifies to one. This is also visually demonstrated.

Below is an example of an exercise, where pupils are asked to state the fraction for each image, and demonstrate equivalence by multiplying fractions.

A teaching point to mention: I did have to structure the working out for the pupils. I would say:

  1. I will write the first image’s fraction
  2. I will write a times sign
  3. I will draw a box for my missing fraction to show equivalence
  4. I will write an equal sign
  5. I will write the second image’s fraction
  6. What number goes in the top of the fraction?
  7. What number goes in the bottom of the fraction?
  8. Check that this fraction simplifies to one?
  9. Are these fractions equivalent? Yes or No?

It was important to include this because I wanted pupils to know exactly how to demonstrate their working out. The pupils in this group struggled to structure their understanding on paper in way which made sense to somebody reading their work. By sticking to the following, essentially sticking to a ‘script’ then pupils were able to demonstrate equivalence consistently in this type of exercise throughout the book.

Pupils were then given exercises where one fraction was equal to an incomplete fraction where they filled in the blank and the fraction that they were multiplying by. Here is an example of a pupil’s work.


In my next blog post, I will  outline the remaining fraction skills that are taught in Engelmann’s sequence of lessons.

Engelmann Insights: Structuring Teaching for the Weakest Pupils (Part 2)

This blog post is the second in a selection of posts outlining the teaching and sequencing of various fractions skills taught in the Connecting Maths Concept Textbook series. Specifically, Level D. The first blog post can be found here. The following content was shown at La Salle’s National Mathematics Conference in Kettering.

Breakdown of each teaching point

5. Simplifying a fraction to an integer

This is commonly taught. What made it so effective in Engelmann’s textbooks was the regular times table exercises (multiplication and division) which were included in every lesson.

Around Lesson 59, pupils were asked to simplify a fraction where short division would be required. Again, this was introduced only after pupils had learnt how to divide using short division.

Similar exercises were given where pupils were only asked to write the division problem before working out the problem. This was to ensure pupils were avoiding the common misconception of writing a division calculation were the divisor is written before the dividend.

6. Stating whether a fraction is an integer or not an integer

In this exercise pupils are asked to state whether a fraction will simplify to an integer, or will it not simplify to an integer. Note that pupils are stating a term for the positive case, and the ‘not’ term for the negative case. The language of mixed number is not introduced. This is because pupils will have to learn two separate terms for two positive cases. When you learn what something is and what it isn’t then you are learning where one concept is true in one instance and when it is false, and the case for when it is not true is the ‘not’ case. It is much easier for pupils to grasp than introducing two different terms for two positive cases.

7. Adding or subtracting fractions with like denominators

Pupils are taught that when the denominators of a fraction are the same then you can add the fractions in they are written. It is explained further that each fraction has each unit divided into the same number of parts, and this is why we can add fractions when they are written this way.

You can’t add these fractions the way they are written because the denominators are not the same.

The most important part of the wording is ‘the way they are written’. Pupils are taught to visually spot when it is possible to add fractions by spotting the denominators being the same. Pupils are then given exercises to decide whether you can add these fractions the way they are written.

Engelmann does go into the reasoning behind why fractions with different denominators cannot be added or subtracted in the way they are written.


8. Listing multiple equivalent fractions for a specific integer

Since pupils practice their times tables in an exercise in each or every other lesson within the textbook series, pupils can quickly learn how to write multiple equivalent fractions for an integer. Pupils learn the multiplicative relationship between the integer and the denominator of an equation. Including ‘1’ as the denominator is important because I think it is sometimes overlooked.

9. Writing fractions from a sentence

Engelmann creates questions which force pupils to deliberately think. Here is a perfect example: pupils are told to write a fraction which meets certain conditions, such as the fraction being more than or less than one. Pupils are also using prior learning in this instance.

Here are a few examples

10. Introducing Mixed numbers 

Mixed numbers are introduced as a sum between an integer and a (proper) fraction.

It is visually presented on a number line, you go to the marker for the whole number. Then you count parts for the fraction.

The skill is revisited where pupils write the addition sum between an integer and a fraction as a mixed number, without the number line. Pupils are then asked to do this again with three or four digit numbers.


Here is an example of a pupil’s work.


In my next blog post, I will  outline the remaining fraction skills that are taught in Engelmann’s sequence of lessons.

Engelmann Insights: Structuring Teaching for the Weakest Pupils (Part 1)

Engelmann’s Connecting Maths Concept Textbook series teaches concepts that all future mathematical study relies upon. For example: the four operations, the relationship between addition and subtraction as well as the relationship between multiplication and division, fractions to simply name a few. In this blog post I will be looking at how the topic of fractions is taught within the first 100 lessons of Engelmann’s CMC textbook series (Level D). I will go through a number of knowledge facts or skills that Engelmann outlines.

Connecting Maths Concept Textbook Series

The CMC textbook series have multiple levels to select from to best suit the children who will be learning from the CMC textbook. I taught the Level D series. The textbooks served the purpose of acting as a remedial programme where pupils received 3-5 one-hour lessons per week on top of their mainstream maths lessons. There is a scripted teacher presentation book, a pupil workbook, pupil textbook and an answer key.

One note to mention on the scripted teacher presentation book. Many teachers do not like being given a teacher script because it seems unusual to teach using somebody else’s words. I felt this way initially. I then completely changed my mindset on this because the script was incredibly accurate, deliberate and economical with text. I realised that Engelmann has written it better than anything else I had seen. I found it to be a really humbling process because it made me realise that I had been very verbose with my teacher talk. I could say much more with fewer words. This is still a controversial topic in the Education world. However, I found that the script helped the children to articulate their understanding because they were able to repeat a precise explanation back to me, that was simply provided through the teacher script. This was something that @MrBlachford commented on too, on Twitter:

A few overarching points

The key theme that Engelmann demonstrates throughout his textbook series is using:

teaching methods of future learning which never contradicts the teaching methods used for prior learning. 

There is total consistency throughout the teaching methods used and applied when learning a specific concept. This will be shown by outlining the teaching of 20 skills on the topic of fractions over a 100 lesson period.  There is also a smooth track of gradual complexity in the problem types that are used to test a pupil’s understanding. The content that is taught looks deceivingly easy but pupils are taught teaching methods that can be applied in the most simplest of cases as well as the most complex of cases.

Engelmann’s lesson spread looks like this. The red sections are the teacher-led parts and the green sections are the parts where pupils work independently. Each lesson covers a range of 5-6 different topics such as adding, subtracting, fractions, times tables, ratio etc.

Breakdown of each teaching point

  1. Stating a fraction from a diagram 

Engelmann introduces how to write a fraction from a diagram by using images where there was more than one unit, as shown below:

The wording to write a fraction was:

The top number is the total number of shaded pieces.

The bottom number is the total number of pieces in one unit. 

The wording was precise, and fool-proof. I did alter the working to ‘the bottom number is the total number of pieces in each unit’ simply because my pupils responded to that with more accuracy. The wording applied to cases where pupils were writing proper fractions, improper fractions as well as whole numbers. The questions that were selected which tested this also:

The wording also avoided the common misconception that pupils have in writing the denominator as the total number of pieces that they can see between the number of shapes shown. This is because the wording say ‘in one unit’.

2. Stating a fraction from a number line

The same wording was introduced. I did explain to pupils that one unit was the gap between each whole number. 

There were exercises where pupils were practising both skill #1 and #2 side by side.

3. Stating whole numbers from a diagram or a number line

If you see a diagram or a number line where a certain number of units are shaded then the diagram or number line represents a whole number. The point is also mentioned that if there are no leftover parts are shaded then we definitely have a whole number. The opposite case is presented that if we do have leftover parts that are shaded then we don’t have a whole number.

The scripted nature of it states: “3 units are shaded. So the fraction for this picture equals 3.”

Similarly, there is a negative example of this where the script words what the teacher says as: “There are more than 3 units shaded, but less than four.”

The testing stage phrased the question as: which picture shows a whole number?

4. Fractions as integers from a diagram

For it to be the case that we are showing an integer visually then there is only one part in each unit, meaning that each unit is one whole shape. The number of shaded units is the top number. The number of parts in each unit is the bottom number. This method is consistent with previous problem types of stating a fraction from a diagram or number line. What I like the most about the sequence of questions is that the nuanced example is taught after the explicit examples. #4 is the nuanced example of stating a fraction from a diagram because its not as straightforward. Engelmann’s presentation book still uses the same wording to state a fraction from a diagram, which shows pupil that they are equipped to answer even the trickest of questions.

The wording to teach pupils how to state a fraction as an integer from a diagram goes as follows:

There is one part in each unit. 4 parts are shaded. The fraction for the picture is 4 over 1. Here is the equation: 4/1 = 4.

There is one part in each unit. 6 parts are shaded. The fraction of the picture is 6 over 1. Here is the equation: 6/1 = 6

I remember one of the boys in my intervention class, looking at the question and attempting it before I started going through it. He did say the correct answer, and he was really impressed with himself. I then asked him how he did it. His response was ‘using the way that you taught me’. He was able to apply the method taught for previous problem types in this case too with no teacher guidance.

Pupils were then asked to state a fraction as an integer from a number line as well.

Pupils completed testing exercises where they had to state a fraction which could simplify to an integer where each unit had more than one part. These exercises also tested a pupil’s prior learning alongside new learning content.
The most difficult problem testing skill #4 was asking pupils to write the fraction for each image that shows a whole number. Pupils are now applying collection of separate component skills where pupils are to: read a number line, write a fraction from the number line, and state whether that fraction is a whole number. 

The next degree of complexity introduced where now pupils need to state the fraction for each whole number on a number line.

Here is the wording used in the textbook:

Here is a number line:

There are three parts in each unit. So the bottom number of each fraction is 3. The bottom number for each fraction is the same:

The top numbers are the numbers for counting:

There are exercises further on in the series of lesson where pupils are given the same task but the number line doesn’t state the number of parts in each unit, instead the denominator is provided.

In my next blog post, I will continue to outline the remaining fraction skills that are taught in Engelmann’s sequence of lessons.

Older posts Newer posts